
The igCombo™ can be configured to run using jQuery or ASP.NET MVC. This help topic demonstrates how to setup a basic igCombo control in each of these environments binding to JSON data on the client and a collection of business object on the server.
You need to first read the following topics:
The following steps demonstrate how to configure basic options and bind to data using both jQuery and ASP.NET MVC.
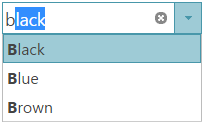
Following is a preview of the final result.
To complete the procedure, you need the following:
Infragistics.Web.Mvc.dll assemblyFollowing is a conceptual overview of the process:
igComboInstantiate the igCombo.
a. Define a target element.
On your web page, define a target HTML element which serves as the base object for the igCombo control and set its ID. This is an optional step for ASP.NET MVC
In HTML:
<div id="comboTarget"></div>
Instantiate the igCombo. In jQuery, you can use the document ready JavaScript event to instantiate the combo. In ASP.NET MVC, use the Ignite UI for MVC to bind to an IQueryable datasource.
In HTML:
 <script type="text/javascript">
      $(function () {
           $("#comboTarget").igCombo({

           });
       });
 </script>
In ASPX:
 <%= Html.
     Infragistics().
     Combo().
     ID("comboTarget").
     Render()
 %>
Bind to data.
a. Define the data.
In jQuery, this example binds to a simple JSON array. This data could be passed as part of the page request or could be returned from a web service. In ASP.NET MVC, this example binds to a collection of Color objects defined in the controller class on the server and returned as the model with the View.
In HTML:
var colors = [{ "Name": "Black" },{ "Name": "Blue" },{ "Name": "Brown" },{ "Name": "Red" },{ "Name": "White" },{ "Name": "Yellow" }];
In C#:
public class DefaultController : Controller
{
     public ActionResult Index()
     {
        List<Color> colors = new List<Color>();
        colors.Add(Color.Black);
        colors.Add(Color.Blue);
        colors.Add(Color.Brown);
        colors.Add(Color.Red);
        colors.Add(Color.White);
        colors.Add(Color.Yellow);

        return View("default", colors.AsQueryable());
     }
}
b. Set the data source.
Use the dataSource option to supply the data to the combo. In ASP.NET MVC, Use the DataSource method to bind to the data passed in as part of the Model.
In HTML:
dataSource: colors
In ASPX:
DataSource(this.Model as IQueryable<System.Drawing.Color>)
c. Configure the text and value fields.
Set the textKey and valueKey options of the igCombo. In this simple example, the textKey and valueKey are both set to the same object value of ‘Name’. However, the textKey and valueKey could be set as two different fields. The valueKey has to be unique value in order to select items properly. For instance, the valueKey could point to an ID field for each color object. The textKey determines which field is used to display the text which represents the bound items in the dropdown list.
Note: The “key” properties designate which properties on the data source of the combo are used as the selected value and selected text of the combo.
In HTML:
textKey: "Name",
valueKey: "Name",
In ASPX:
TextKey("Name").
ValueKey("Name").
d. (ASP.NET MVC) Call Render().
When instantiating the Ignite UI for MVC Combo, call the Render method last after all other options have been configured. This is the method that renders the HTML and JavaScript necessary to instantiate the igCombo on the client
In ASPX:
Render()
(Optional) Configure the width.
The width option accepts a string value that configures the width attribute of the igCombo’s base DOM element. The value can be set to any HTML size unit supported by the target web browser.
In HTML:
width: "200px"
In ASPX:
Width("200px")
(Optional) Enabling auto-complete.
Use the autoComplete option to enable auto-complete in the igCombo
In HTML:
autoComplete: true
In ASPX:
AutoComplete(true)
The following table lists the code examples provided below.
| Example | Description |
|---|---|
| Basic jQuery Implementation | Shows how to bind to data and set basic options in jQuery |
| Basic ASP.NET MVC Implementation | Shows how to bind to data and set basic options using the Ignite UI for MVC |
The code below demonstrates how to create and configure the igCombo control using jQuery with the following parameters:
| Data Source | JSON data |
|---|---|
| Text Key | Name |
| Value Key | Name |
| Width | 200px |
| AutoComplete | true |
In HTML:
<script type="text/javascript">
    $(function () {
        var colors = [
            { "Name": "Black" },
            { "Name": "Blue" },
            { "Name": "Brown" },
            { "Name": "Red" },
            { "Name": "White" },
            { "Name": "Yellow" }
        ];
        $("#comboTarget").igCombo({
            dataSource: colors,
            textKey: "Name",
            valueKey: "Name",
            width: "200px",
            autoComplete: true
        });
    });
</script>
The code below demonstrates how to create and configure the Ignite UI for MVC Combo control with the following parameters:
| Property | Value |
|---|---|
| Data Source | IQueryable |
| Script files | Name |
| Value Key | Name |
| Width | 300px |
| AutoComplete | true |
In ASPX:
<%= Html.
    Infragistics().
    Combo().
    ID("comboTarget").
    DataSource(this.Model as IQueryable<System.Drawing.Color>).
    ValueKey("Name").
    TextKey("Name").
    Width("300px").
    AutoComplete(true).
    Render()
%>
In C#:
public class DefaultController : Controller{
   public ActionResult Index()    {
          List<Color> colors = new List<Color>();
    colors.Add(Color.Black);
    colors.Add(Color.Blue);
    colors.Add(Color.Brown);
    colors.Add(Color.Red);
    colors.Add(Color.White);
    colors.Add(Color.Yellow);
    return View("default", colors.AsQueryable());
 }}
Following are some other topics you may find useful.
View on GitHub