
The igGrid's data source and features are able to work directly with OData services, but there are some configuration prerequisites. The following sections describe the specifics when configuring igGrid for oData biding as well as a walkthrough demonstrating how to bind to an Entity Framework OData service.
When the data is retrieved from a remote service it’s important to check if the object that contains the data records is wrapped in other objects. If the data returned from the service is wrapped in the response object, then you need to set the reponseDataKey to point to the object in the response that contains the data records for the grid. For example, consider a service where the response data has the following format:
 {  "odata.metadata":"http://localhost/odata/$metadata#Products&$select=ProductID,ProductName,QuantityPerUnit,UnitPrice,UnitsInStock",
"odata.count":"79",
"value":[
    {
      "ProductID":1,"ProductName":"Chai",
"QuantityPerUnit":"10 boxes x 20 bags",
"UnitPrice":"18.0000","UnitsInStock":39
    },
{
      "ProductID":2,"ProductName":"Chang",
"QuantityPerUnit":"24 - 12 oz bottles",
"UnitPrice":"19.0000","UnitsInStock":17
    }
…
]
}
In order for the grid to successfully bind to the actual data records the grid's responseDataKey property must be set to value in order to look for the records in the value object.
Also, if remote Paging is enabled, the recordCountKey option of the Paging feature must be set to a value that corresponds to the property in the response that holds the total number of records. For example if the data response has a format similar to the example above the recordCountKey must be set to odata.count, which is the option that holds the current records count.
By default igGrid will send oData requests when initialized in JavaScript.
The Ignite UI for MVC Grid however uses different request parameters which are used by the built in remote features support provided by the Infragistics.Web.Mvc.dll, so if you want to use it to bind to the oData service you need to set the corresponding feature URL parameters to null.
This procedure guides you through the process of creating an igGrid in a MVC application together with an OData service that retrieves data from a SQL Database using Entity Framework.
In order to complete this procedure you need to have the Ignite UI for jQuery product installed on your machine and have the Northwind Database installed in SQL Server. This procedure also assumes that you are using Visual Studio 2013 and MVC5.
Set up the project
In Visual Studio 2013 create a new ASP.NET Web Application. When prompted, select the “Empty” template and check the box to add folders and core references for Web API and MVC.
Install the following packages from Nuget either via the Package Manager Console or via the Nuget Packages Dialog :
jQuery
jQuery.UI.Combined
EntityFramework
Modernizr
Add a reference to System.Runtime.Serialization.
Create the Models
Create the Product class
In C#:
public class Product
{
public int ProductID { get; set; }
public string ProductName { get; set; }
public int CategoryID { get; set; }
public string QuantityPerUnit { get; set; }
public decimal? UnitPrice { get; set; }
public short? UnitsInStock { get; set; }
public bool Discontinued { get; set; }
}
Add a class called NorthwindContext which should derive from DbContext. Then add a DbSet for the Product class added in the previous step.
In C#:
public class NorthwindContext : DbContext
{
    public DbSet<Product> Products { get; set; }
}
Add a connection string in the web.config file to connect to the Northwind database, making sure that the name matches that of your DbContext class.
<connectionStrings>
<add name="NorthwindContext" connectionString="data source=.;
  initial catalog=Northwind;integrated security=True;
  MultipleActiveResultSets=True;App=EntityFramework"
  providerName="System.Data.SqlClient"/>
</connectionStrings>
Create the oData service
Add a new controller to the Controllers folder. In the Add Scaffold dialog select “Web API 2 OData Controller with actions, using Entity Framework.” Apply the following settings:
Data context class: NorthwindContext (or whichever name you used for the DbContext class)
Using these settings, Visual Studio will create an OData service targeting the Product entities. Methods will be created for Get, Put, Post, Patch and Delete.
Open App_Start\WebApiConfig.cs and modify the Register method to expose the Products end point. You need to modify the routes to support oData routing conventions:
In C#
public static void Register(HttpConfiguration config)
{
   ODataConventionModelBuilder builder =
  new ODataConventionModelBuilder();
  builder.EntitySet<Product>("Products");
  config.Routes.MapODataRoute("odata", "odata",
  builder.GetEdmModel());
}
Create the View
Create a new, empty MVC 5 Controller called HomeController.
In HomeController, right click on Index and select Add View.
In the Add View dialog change Template to Empty (without model). Make sure all the checkboxes at the bottom are unchecked and click Add.
At the top of Index.cshtml add a using statement for Infragistics.Web.Mvc. (IntelliSense should help you complete this) If the Infragistics assembly is not recognized, close the view and compile the application to make sure that the Infragistics.Web.Mvc assembly is copied in to the bin folder. When you reopen the view file the Infragistics reference should now be recognized.
In Index.cshtml add JavaScript references for jQuery, jQuery UI, Modernizr, and the Ignite UI for jQuery controls.
In HTML:
  <script src="@Url.Content("Scripts/jquery-2.1.1.js")"></script>
  <script src="@Url.Content("Scripts/jquery-ui-1.10.4.js")"></script>
  <script src="@Url.Content("Scripts/modernizr-2.7.2.js")"></script>
  <script src="@Url.Content("Scripts/Infragistics/infragistics.core.js")"></script>
  <script src="@Url.Content("Scripts/Infragistics/infragistics.lob.js")"></script>
In Index.cshtml add links to the Infragistics theme and structure style sheets in the HEAD of the document.
In HTML:
<link href="@Url.Content("Content/Infragistics/themes/infragistics/infragistics.theme.css")" rel="stylesheet" />
<link href="@Url.Content("Content/Infragistics/structure/modules/infragistics.css")" rel="stylesheet" />
Create an Ignite UI for jQuery grid on the page.
Add the declaration for the igGrid that uses the Product class as its record type. The DataSourceUrl property must point to the Products endpoint of the service. The ResponseDataKey property must be set to the name of the property that holds the data in the response, which in our example is value. The DataBind and Render methods then need to be added to make sure that the control is bound to the DataSource and rendered in to the markup.
@(Html.Infragistics().Grid<igGrid_With_WebAPI.Models.Product>().ID("grid1")
.Width("900px").Height("500px")
.DataSourceUrl("/odata/Products")
.ResponseDataKey("value")
.DataBind()
.Render()
If you wish to specify the columns you can set the AutoGenerateColumns option to false and define the columns explicitly.
.AutoGenerateColumns(false)
.Columns(column =>
{
  column.For(p => p.ProductID).HeaderText("Product ID")
      .Width("100px");
  column.For(p => p.ProductName).HeaderText("Product Name")
      .Width("250px");
  column.For(p => p.QuantityPerUnit).HeaderText("Quantity Per Unit")
      .Width("250px");
  column.For(p => p.UnitPrice).HeaderText("Unit Price")
      .Width("100px");
  column.For(p => p.UnitsInStock).HeaderText("Units In Stock")
      .Width("150px");
})
Enable remote Paging, Sorting and Filtering. The Type for each of these features should be set to OpType.Remote.
The RecordCountKey option for the Paging Feature should be set to the object in the data source that contains the number of records in the data source. In this particular example that should be set to odata.count. All the other Url keys must be set to null.
.Features(features =>
    {
          features.Paging().PageSize(10).Type(OpType.Remote)
              .PageIndexUrlKey(null).PageSizeUrlKey(null)
              .RecordCountKey("odata.count");
          features.Sorting().Type(OpType.Remote)
              .SortUrlKeyDescValue(null)
              .SortUrlAscValueKey(null)
              .SortUrlKey(null);
          features.Filtering().Type(OpType.Remote)
              .FilterExprUrlKey(null)
              .FilterLogicUrlKey(null);
    })
The final code after following these steps should look similar to the following:
  @(Html.Infragistics().Grid<igGrid_With_WebAPI.Models.Product>().ID("grid1")
    .AutoGenerateColumns(false)
    .Columns(column =>
    {
        column.For(p => p.ProductID).HeaderText("Product ID")
        .Width("100px");
        column.For(p => p.ProductName).HeaderText("Product Name")
        .Width("250px");
        column.For(p => p.QuantityPerUnit)
        .HeaderText("Quantity Per Unit").Width("250px");
        column.For(p => p.UnitPrice).HeaderText("Unit Price")
        .Width("100px");
        column.For(p => p.UnitsInStock).HeaderText("Units In Stock")
        .Width("150px");
    })
    .Features(features =>
    {
        features.Paging().PageSize(10).Type(OpType.Remote)
            .PageIndexUrlKey(null).PageSizeUrlKey(null)
            .RecordCountKey("odata.count");
        features.Sorting().Type(OpType.Remote)
            .SortUrlKeyDescValue(null)
            .SortUrlAscValueKey(null)
            .SortUrlKey(null);
        features.Filtering().Type(OpType.Remote)
            .FilterExprUrlKey(null)
            .FilterLogicUrlKey(null);
    })
    .Width("900px").Height("500px")
    .DataSourceUrl("/odata/Products")
    .ResponseDataKey("value")
    .DataBind()
    .Render()
)
The grid will initially load with no data but the Ajax indicator will appear while the data is being fetched from the service. Once the data is retrieved, the grid will appear similar to the following:
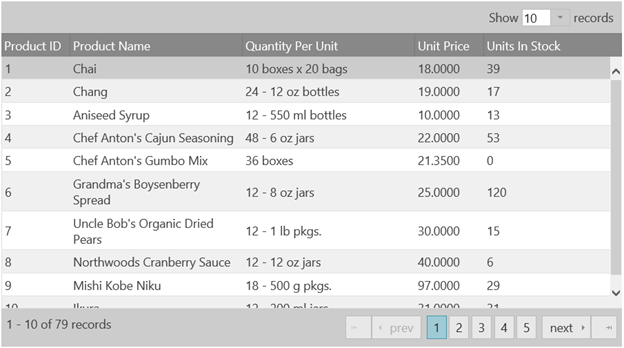
If you inspect the request using the developer tools of your browser you will see that the Grid is only requesting the records that it currently needs to render. The initial request URL will contain the $skip and $top parameters due to the remote Paging feature so that only the data for the current page will be returned and bound to the grid. The initial response will look similar to this:
In JavaScript
{
  "odata.metadata":"http://localhost/odata/$metadata#Products&$select=ProductID,ProductName,QuantityPerUnit,UnitPrice,UnitsInStock","odata.count":"77","value":[
    {
      "ProductID":1,"ProductName":"Chai","QuantityPerUnit":"10 boxes x 20 bags","UnitPrice":"18.0000","UnitsInStock":39
    },{
      "ProductID":2,"ProductName":"Chang","QuantityPerUnit":"24 - 12 oz bottles","UnitPrice":"19.0000","UnitsInStock":17
    },{
      "ProductID":3,"ProductName":"Aniseed Syrup","QuantityPerUnit":"12 - 550 ml bottles","UnitPrice":"10.0000","UnitsInStock":13
    },{
      "ProductID":4,"ProductName":"Chef Anton's Cajun Seasoning","QuantityPerUnit":"48 - 6 oz jars","UnitPrice":"22.0000","UnitsInStock":53
    },{
      "ProductID":5,"ProductName":"Chef Anton's Gumbo Mix","QuantityPerUnit":"36 boxes","UnitPrice":"21.3500","UnitsInStock":0
    },{
      "ProductID":6,"ProductName":"Grandma's Boysenberry Spread","QuantityPerUnit":"12 - 8 oz jars","UnitPrice":"25.0000","UnitsInStock":120
    },{
      "ProductID":7,"ProductName":"Uncle Bob's Organic Dried Pears","QuantityPerUnit":"12 - 1 lb pkgs.","UnitPrice":"30.0000","UnitsInStock":15
    },{
      "ProductID":8,"ProductName":"Northwoods Cranberry Sauce","QuantityPerUnit":"12 - 12 oz jars","UnitPrice":"40.0000","UnitsInStock":6
    },{
      "ProductID":9,"ProductName":"Mishi Kobe Niku","QuantityPerUnit":"18 - 500 g pkgs.","UnitPrice":"97.0000","UnitsInStock":29
    },{
      "ProductID":10,"ProductName":"Ikura","QuantityPerUnit":"12 - 200 ml jars","UnitPrice":"31.0000","UnitsInStock":31
    }
  ]
}
When changing the page or page size the query parameters will be updated appropriately and a new set of data will be returned. When using sorting and filtering the $orderby and $filter query parameters will be also added.
View on GitHub