
The ability to apply styles to cells is one of the ways the Infragistics.Documents.Excel assembly allows you to customize your worksheets. Every aspect of the cell can be customized and each cell can appear differently. You can control the font used in the cell, the call background and borders, and the placement and rotation of text. You can even use different formats for different pieces of text in the same cell.
Most styles can be applied by setting properties on the CellFormat property of WorksheetCell , WorksheetRow , WorksheetColumn , and WorksheetMergedCellsRegion .
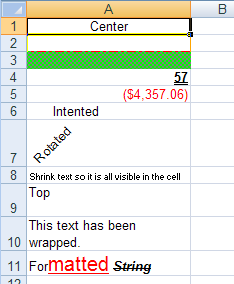
This walkthrough will show you how to apply a variety of styles to the cells of a worksheet.
Create a workbook with a worksheet.
Create a Workbook with one Worksheet:
In Visual Basic:
Dim workbook As New Infragistics.Documents.Excel.Workbook()
Dim worksheet As Infragistics.Documents.Excel.Worksheet = _
  workbook.Worksheets.Add("Sheet1")
In C#:
Infragistics.Documents.Excel.Workbook workbook = new Infragistics.Documents.Excel.Workbook();
Infragistics.Documents.Excel.Worksheet worksheet = workbook.Worksheets.Add( "Sheet1" );
Increase the width of the first column so all text for the cells is visible:
In Visual Basic:
worksheet.Columns.Item(0).Width = 6000
In C#:
worksheet.Columns[0].Width = 6000;
Apply the styles to the cells.
Change the horizontal alignment of a cell so the value is centered in the cell:
In Visual Basic:
worksheet.Rows.Item(0).Cells.Item(0).Value = "Center"
worksheet.Rows.Item(0).Cells.Item(0).CellFormat.Alignment = _
  Infragistics.Documents.Excel.HorizontalCellAlignment.Center
In C#:
worksheet.Rows[0].Cells[0].Value = "Center";
worksheet.Rows[0].Cells[0].CellFormat.Alignment =
  Infragistics.Documents.Excel.HorizontalCellAlignment.Center;
Give the cell different border styles and colors to separate it from other cells:
In Visual Basic:
worksheet.Rows.Item(1).Cells.Item(0).CellFormat.BottomBorderColor = Color.Red
worksheet.Rows.Item(1).Cells.Item(0).CellFormat.BottomBorderStyle = _
  Infragistics.Documents.Excel.CellBorderLineStyle.DashDot
worksheet.Rows.Item(1).Cells.Item(0).CellFormat.LeftBorderColor = Color.Yellow
worksheet.Rows.Item(1).Cells.Item(0).CellFormat.LeftBorderStyle = _
  Infragistics.Documents.Excel.CellBorderLineStyle.Thick
worksheet.Rows.Item(1).Cells.Item(0).CellFormat.RightBorderColor = Color.Orange
worksheet.Rows.Item(1).Cells.Item(0).CellFormat.RightBorderStyle = _
  Infragistics.Documents.Excel.CellBorderLineStyle.Thin
worksheet.Rows.Item(1).Cells.Item(0).CellFormat.TopBorderColor = Color.Blue
worksheet.Rows.Item(1).Cells.Item(0).CellFormat.TopBorderStyle = _
  Infragistics.Documents.Excel.CellBorderLineStyle.Double
In C#:
worksheet.Rows[1].Cells[0].CellFormat.BottomBorderColor = Color.Red;
worksheet.Rows[1].Cells[0].CellFormat.BottomBorderStyle =
  Infragistics.Documents.Excel.CellBorderLineStyle.DashDot;
worksheet.Rows[1].Cells[0].CellFormat.LeftBorderColor = Color.Yellow;
worksheet.Rows[1].Cells[0].CellFormat.LeftBorderStyle =
  Infragistics.Documents.Excel.CellBorderLineStyle.Thick;
worksheet.Rows[1].Cells[0].CellFormat.RightBorderColor = Color.Orange;
worksheet.Rows[1].Cells[0].CellFormat.RightBorderStyle =
  Infragistics.Documents.Excel.CellBorderLineStyle.Thin;
worksheet.Rows[1].Cells[0].CellFormat.TopBorderColor = Color.Blue;
worksheet.Rows[1].Cells[0].CellFormat.TopBorderStyle =
  Infragistics.Documents.Excel.CellBorderLineStyle.Double;
Apply a background style to a cell to it stands out:
In Visual Basic:
worksheet.Rows.Item(2).Cells.Item(0).CellFormat.FillPattern = _
  Infragistics.Documents.Excel.FillPatternStyle.DiagonalCrosshatch
worksheet.Rows.Item(2).Cells.Item(0).CellFormat.FillPatternBackgroundColor = _
  Color.Lime
worksheet.Rows.Item(2).Cells.Item(0).CellFormat.FillPatternForegroundColor = _
  Color.Gray
In C#:
worksheet.Rows[2].Cells[0].CellFormat.FillPattern =
  Infragistics.Documents.Excel.FillPatternStyle.DiagonalCrosshatch;
worksheet.Rows[2].Cells[0].CellFormat.FillPatternBackgroundColor =
  Color.Lime;
worksheet.Rows[2].Cells[0].CellFormat.FillPatternForegroundColor =
  Color.Gray;
Change the font of a cell so its value appears differently:
In Visual Basic:
worksheet.Rows.Item(3).Cells.Item(0).Value = 57
worksheet.Rows.Item(3).Cells.Item(0).CellFormat.Font.Bold = _
  Infragistics.Documents.Excel.ExcelDefaultableBoolean.True
worksheet.Rows.Item(3).Cells.Item(0).CellFormat.Font.UnderlineStyle = _
  Infragistics.Documents.Excel.FontUnderlineStyle.Double
In C#:
worksheet.Rows[3].Cells[0].Value = 57;
worksheet.Rows[3].Cells[0].CellFormat.Font.Bold =
  Infragistics.Documents.Excel.ExcelDefaultableBoolean.True;
worksheet.Rows[3].Cells[0].CellFormat.Font.UnderlineStyle =
  Infragistics.Documents.Excel.FontUnderlineStyle.Double;
Apply a format string to a cell so the type of value displayed is easily recognized (the following cell is used to display currency):
In Visual Basic:
worksheet.Rows.Item(4).Cells.Item(0).Value = -4357.059
worksheet.Rows.Item(4).Cells.Item(0).CellFormat.FormatString = _
  """$""#,##0.00_);[Red](""$""#,##0.00)"
In C#:
worksheet.Rows[4].Cells[0].Value = -4357.059;
worksheet.Rows[4].Cells[0].CellFormat.FormatString =
  ""$"#,##0.00_);[Red]("$"#,##0.00)";
Indent text in a cell:
In Visual Basic:
worksheet.Rows.Item(5).Cells.Item(0).Value = "Intented"
worksheet.Rows.Item(5).Cells.Item(0).CellFormat.Indent = 2
In C#:
worksheet.Rows[5].Cells[0].Value = "Intented";
worksheet.Rows[5].Cells[0].CellFormat.Indent = 2;
Rotate text in a cell:
In Visual Basic:
worksheet.Rows.Item(6).Cells.Item(0).Value = "Rotated"
worksheet.Rows.Item(6).Cells.Item(0).CellFormat.Rotation = 45
In C#:
worksheet.Rows[6].Cells[0].Value = "Rotated";
worksheet.Rows[6].Cells[0].CellFormat.Rotation = 45;
Shrink text to fit in the cell:
In Visual Basic:
worksheet.Rows.Item(7).Cells.Item(0).Value = _
  "Shrink text so it is all visible in the cell"
worksheet.Rows.Item(7).Cells.Item(0).CellFormat.ShrinkToFit = _
  Infragistics.Documents.Excel.ExcelDefaultableBoolean.True
In C#:
worksheet.Rows[7].Cells[0].Value =
  "Shrink text so it is all visible in the cell";
worksheet.Rows[7].Cells[0].CellFormat.ShrinkToFit =
  Infragistics.Documents.Excel.ExcelDefaultableBoolean.True;
Change the vertical alignment of a cell so the value appears at the top of the cell when it does not have a default height:
In Visual Basic:
worksheet.Rows.Item(8).Height = 500
worksheet.Rows.Item(8).Cells.Item(0).Value = "Top"
worksheet.Rows.Item(8).Cells.Item(0).CellFormat.VerticalAlignment = _
  Infragistics.Documents.Excel.VerticalCellAlignment.Top
In C#:
worksheet.Rows[8].Height = 500;
worksheet.Rows[8].Cells[0].Value = "Top";
worksheet.Rows[8].Cells[0].CellFormat.VerticalAlignment =
  Infragistics.Documents.Excel.VerticalCellAlignment.Top;
Wrap the text in a cell so it does hang over into the next cell or get cut off:
In Visual Basic:
worksheet.Rows.Item(9).Cells.Item(0).Value = _
  "This text has been wrapped."
worksheet.Rows.Item(9).Cells.Item(0).CellFormat.WrapText = _
  Infragistics.Documents.Excel.ExcelDefaultableBoolean.True
In C#:
worksheet.Rows[9].Cells[0].Value =
  "This text has been wrapped.";
worksheet.Rows[9].Cells[0].CellFormat.WrapText =
  Infragistics.Documents.Excel.ExcelDefaultableBoolean.True;
Apply mixed formatting to the text in a cell using a FormattedString object:
In Visual Basic:
Dim formattedString As Infragistics.Documents.Excel.FormattedString = _
  New Infragistics.Documents.Excel.FormattedString("Formatted String")
worksheet.Rows.Item(10).Cells.Item(0).Value = formattedString

Dim font1 As Infragistics.Documents.Excel.FormattedStringFont = _
  formattedString.GetFont(3, 6)
font1.Color = Color.Red
font1.UnderlineStyle = Infragistics.Documents.Excel.FontUnderlineStyle.Single
font1.Height = 300

Dim font2 As Infragistics.Documents.Excel.FormattedStringFont = _
  formattedString.GetFont(10)
font2.Bold = Infragistics.Documents.Excel.ExcelDefaultableBoolean.True
font2.Italic = Infragistics.Documents.Excel.ExcelDefaultableBoolean.True
font2.Strikeout = Infragistics.Documents.Excel.ExcelDefaultableBoolean.True
In C#:
Infragistics.Documents.Excel.FormattedString formattedString =
  new Infragistics.Documents.Excel.FormattedString( "Formatted String" );
worksheet.Rows[10].Cells[0].Value = formattedString;

Infragistics.Documents.Excel.FormattedStringFont font1 = formattedString.GetFont( 3, 6 );
font1.Color = Color.Red;
font1.UnderlineStyle = Infragistics.Documents.Excel.FontUnderlineStyle.Single;
font1.Height = 300;

Infragistics.Documents.Excel.FormattedStringFont font2 = formattedString.GetFont( 10 );
font2.Bold = Infragistics.Documents.Excel.ExcelDefaultableBoolean.True;
font2.Italic = Infragistics.Documents.Excel.ExcelDefaultableBoolean.True;
font2.Strikeout = Infragistics.Documents.Excel.ExcelDefaultableBoolean.True;
Serialize the workbook.
Write the workbook to a file:
In Visual Basic:
workbook.Serialize("C:Styles.xls")
In C#:
workbook.Serialize( "C:Styles.xls" );
View on GitHub