
The Ignite UI for jQuery™ upload control, or igUpload, is a control that allows you to upload any types of files, sending them from the client browser to the server. The size of the uploaded files can be restricted only by server limitations, so you can upload large files with size more than default 10MB.
The upload control is able to handle single uploads (default) or simultaneous multiple file upload operations. To facilitate multiple uploads, the control uses an HTML iframe element to upload files in the background. When the file is uploaded then iframe is removed as a HTML .
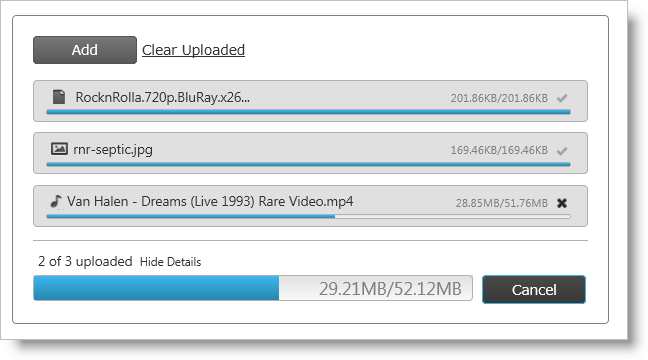
There are a number of UI elements that support the upload control as depicted in Figure 1. Visual elements include:
During multiple uploads visual elements include:
Use of the igUpload control consists of two required parts - client-side jQuery widget and server-side logic which is responsible for handling and processing each upload request. The server is also responsible for processing the upload itself. The example in this document implements server code using ASP.NET Framework, but the igUpload control is independent of server technology.
The upload control exposes a rich jQuery API, so that the controls can be easily configured on the client-side. Also, developers using the Microsoft® ASP.NET MVC framework can leverage the upload control’s server-side component to configure the control with their .NET™ language of choice.
The igUpload control may be extensively styled giving you an opportunity to provide a completely different look and feel for the control as opposed to the default style. Styling options include using your own styles as well as styles from jQuery UI’s ThemeRoller.
Figure 1: The igUpload control as presented to the user
This example demonstrates how to include and implement the client-side logic of the control and how to configure the server-side so that it receives and saves the uploaded files.
Note: For more information about the server-side architecture and implementation is available in: Using the HTTP Handler and Module (igUpload).
This sample demonstrates a basic upload scenario in Single Mode, which will start the upload automatically.
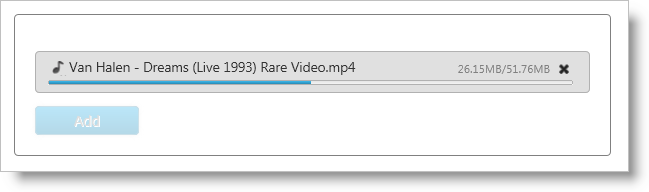
Figure 2
On your HTML page or ASP.NET MVC View, reference the required JavaScript files, CSS files, and ASP.NET MVC assemblies.
In HTML:
<link type="text/css" href="/css/themes/infragistics/infragistics.theme.css" rel="stylesheet" /><link type="text/css" href="/css/structure/infragistics.css" rel="stylesheet" />
 <script type="text/javascript" src="/Scripts/jquery-1.4.4.min.js"></script>
<script type="text/javascript" src="/Scripts/jquery-ui.min.js"></script>
<script type="text/javascript" src="/Scripts/Samples/infragistics.core.js"></script><script type="text/javascript" src="/Scripts/Samples/infragistics.lob.js"></script>
In ASPX:
<%@ Import Namespace="Infragistics.Web.Mvc" %><link type="text/css" href="<%= Url.Content("~/css/themes/infragistics/infragistics.theme.css") %>" rel="stylesheet" />
<link type="text/css" href="<%= Url.Content("~/css/structure/infragistics.css") %>" rel="stylesheet" />
<script type="text/javascript" src="<%= Url.Content("~/Scripts/jquery-1.4.4.min.js") %>"></script>
<script type="text/javascript" src="<%= Url.Content("~/Scripts/jquery-ui.min.js") %>"></script>
<script type="text/javascript" src="<%= Url.Content("~/Scripts/Samples/infragistics.core.js") %>"></script><script type="text/javascript" src="<%= Url.Content("~/Scripts/Samples/infragistics.lob.js") %>"></script>
In Razor:
@using Infragistics.Web.Mvc;

<link type="text/css" href="@Url.Content("~/css/theme/infragistics/infragistics.theme.css")" rel="stylesheet" />
<link type="text/css" href="@Url.Content("~/css/structure/infragistics.css")" rel="stylesheet" />

<script type="text/javascript" src="@Url.Content("~/Scripts/jquery-1.4.4.min.js")"></script>
<script type="text/javascript" src="@Url.Content("~/Scripts/jquery-ui.min.js")"></script>
<script type="text/javascript" src="@Url.Content("~/Scripts/Samples/infragistics.core.js")"></script><script type="text/javascript" src="@Url.Content("~/Scripts/Samples/infragistics.lob.js")"></script>
For jQuery implementations, define a DIV as the target element in HTML. This step is optional for ASP.NET MVC implementations as the Ignite UI for MVC creates the containing element for you.
In HTML:
<div id="igUpload1"></div>
Once the above setup is complete, begin to set options including ID, autostartupload and progressUrl. The last property defines the URL of the HTTP handler that returns file status progress and file size information and handles cancel upload command. That’s all you need on the client-side widget to connect with server-side and get the upload control to work. The remaining options have their default values. For example for the upload mode is single. Note: For the ASP.NET MVC Views, the Render method must be called after all other options are set.
In jQuery:
<script type="text/javascript" language="javascript">
$(window).load(function () {
    $("#igUpload1").igUpload({
        autostartupload: true,
        progressUrl: "/IGUploadStatusHandler.ashx"
    });
});
</script>
In ASPX:
<%= Html.Infragistics().Upload()
    .ID("igUpload1")
    .AutoStartUpload(true)
    .ProgressUrl("/IGUploadStatusHandler.ashx")
    .Render()
%>
In Razor:
@(  Html.Infragistics().Upload()
    .ID("igUpload1")
    .AutoStartUpload(true)
    .ProgressUrl("/IGUploadStatusHandler.ashx")
    .Render()
)
Note: If you are using igUpload in a MVC project, you will need to ignore the URL of the HTTP handler in the Global.asax file:
In Global.asax:
    protected static void RegisterRoutes(RouteCollection routes)
    {
        routes.IgnoreRoute("IGUploadStatusHandler.ashx");
    }
Next you must configure the server-side HTTP Handler and Module.
The required HTTP handler and Module are part of the Infragistics.Web.MVC dll as well as the Ignite UI for MVC. Follow the steps below to register them in the Web.config file.
igUpload knows where to save the files. For the current example the folder is called Uploads.You can restrict the size of the uploaded files by setting the maxFileSizeLimit setting. In this sample this size is about 100 MB.
In web.config:
<appSettings>
    <add key="fileUploadPath" value="~/Uploads" />
    <add key="maxFileSizeLimit" value="100000000" />
</appSettings>
Note: The value of
maxFileSizeLimitis in bytes.
Then you need to register the modules and handlers. Depending on your server you should configure Web.config file.
In web.config:
<system.web>
    <httpHandlers>
         <add verb="GET" type="Infragistics.Web.Mvc.UploadStatusHandler"
                         path="IGUploadStatusHandler.ashx" />
    </httpHandlers>
    <httpModules>
        <add name="IGUploadModule" type="Infragistics.Web.Mvc.UploadModule" />
    </httpModules>
    <!--OPTIONAL: Set the maximum request length.
    By default the request lenght is 4 MB.
    More info: http://msdn.microsoft.com/en-us/library/e1f13641(v=vs.85).aspx-->
    <httpRuntime executionTimeout="3600" maxRequestLength="2097151000"/>
</system.web>
In web.config:
<system.webServer>
    <modules runAllManagedModulesForAllRequests="true">
        <add name="IGUploadModule" type="Infragistics.Web.Mvc.UploadModule"
                                   preCondition="managedHandler" />
    </modules>
    <handlers>
        <add name="IGUploadStatusHandler" path="IGUploadStatusHandler.ashx" verb="*"
            type="Infragistics.Web.Mvc.UploadStatusHandler" preCondition="integratedMode" />
   </handlers>
   <security>
        <requestFiltering>
            <!--OPTIONAL: Set the maximum request length.
            By default the request lenght is ~30 MB.
            More info: http://www.iis.net/configreference/system.webserver/security/requestfiltering/requestlimits-->
            <requestLimits maxAllowedContentLength="2097151000"/>
      </requestFiltering>
   </security>
</system.webServer>
Run the web page and you will get the basic upload control. Then you can select a file from the file picker that your browser displays and monitor the progress information that igUpload exposes as shown in Figure 2.
Note: If you are still not able to run the upload control, please follow this link to explore possible errors Using Client-Side Events (igUpload). The client-side events topic explains how to attach to a client-side event onError and investigate the problem.
igUpload comes with an application wide settings, which control the behavior of the HTTP Module and Handler. Those settings are configured in application's web.config file.
Table 1: igUpload application settings
| Setting | Description | Default value |
|---|---|---|
| FileUploadPath | Configures the path to which the files will be uploaded. | "~/Uploads" |
| CustomDictionaryProvider |
Configures a third party dictionary provider (the structure which holds the metadata for the currently uploading files).
This setting is specifically designed for Web Farm/Web Garden scenarios where a common file metadata should be shared between multiple machines/processes.
This setting expects a name of a type which implements ISafeDictionary<string, UploadInfo> interface.
|
- |
| FileSaveType | Configures the upload processing lifecycle. It can be "filestream" or "memorystream". In "filestream" mode the HTTP module will process file automatically and save it to the FileUploadPath directory. In "memorystream" mode the file is uploaded to the server RAM and it should be manually saved to a permanent storage (disk, database) by handling some of the server-side events FileUploading or UploadFinishing. For more information on "memorystream" mode refer to Saving Files as Stream topic. | "filestream" |
| maxFileSizeLimit | Configures the limit of the maximum file size which can be uploaded. | "4194304" |
| bufferSize | Configures the size of each chunk of data which is uploaded to the server. | "16384" |
| allowedMIMEType |
Configures the MIME types which can be uploaded. Multiple MIME types can be listed separated with "|".
Example:
<add key="allowedMIMEType" value="image/jpeg|image/gif"/>
|
"*" |
View on GitHub