
This topic demonstrates how how to create basic conditional template using the templating engine.
The following table lists the topics required as a prerequisite to understanding this topic.
Adding Templating Engine References: This topic gives information on what is the minimal set of necessary Java Script files to start using the templating engine
Templating Engine Overview: This topic contains information regarding the features supported by the templating Engine
This topic contains the following sections:
In this example basic substitution template is created and the result is appended to a html table
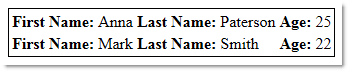
The following screenshot is a preview of the final result. In this example records with age value less than 21 are not shown. In the particular example, there are three records into the data source, but only two are rendered as a result.
To complete the procedure you need the following:
templating engine. (For details, refer to Adding igTemplating References )The following steps demonstrate how to create basic conditional template.
Add and apply the row template using IG Template Engine
Add sample data and row template to the page:
In JavaScript:
 <script type="text/javascript">
 var employees = [
 { firstName: "Joseph", lastName: "Sommers", age: 17 },
 {  firstName: "Anna", lastName: "Paterson", age: 25},
 {  firstName: "Mark", lastName: "Smith", age: 22}];
 var template = '{{if ${age} > 21 }} <tr><td><b>First Name: </b>${firstName}</td><td><b>Last Name: </b>${lastName}</td><td><b>Age: </b>${age}</td></tr> {{/if}}';
 </script>
In HTML:
 <body>
 <table id="resultTable" style="border: 1px solid #000;"></table>
 </body>
Apply the template and append the result to the html table
In JavaScript:
 <script type="text/javascript">
 $(document).ready(function () {
       var result = $.ig.tmpl(template, employees);
       $('#resultTable').html(result);
 });
 </script>
(Optional) Verify the result
Save the file and double click to preview the result. According to the applied check into the template only two rows should be rendered, as the third row has value into the age property lower than 21
The easiest way to create an igGrid with basic conditional template configured is via the Ignite UI CLI. To install the Ignite UI CLI:
npm install -g igniteui-cli
Once the Ignite UI CLI is installed the commands for generating an Ignite UI for jQuery project, adding a new igGrid component with basic conditional template, building and serving the project are as following:
ig new <project name>
cd <project name>
ig add grid-templating newGridTemplating
ig start
This command will add a new igGrid with templating configured, same as the one demonstrated in our Conditional Templates sample.
For more information and the list of all available commands read the Using Ignite UI CLI topic.
The following topics provide additional information related to this topic.
Templating Engine Overview: This topic lists the topics with all the information related to the IG Template Engine
Creating an Alternating Rows Template: This topic demonstrates how to create alternative row template using the templating engine
Creating a Basic Substitution Template: This topic demonstrates how to create basic substitution template using the templating engine.
Creating a Complex Property Substitution Template: This topic demonstrates how to create complex property substitution template using the templating engine.
Creating a Conditional Template Containing a Default Statement: This topic demonstrates how to create conditional template containing a default statement using the templating engine
Creating a Multi-Conditional Template Containing a Default Statement: This topic demonstrates, with code examples, how to create multi-conditional template containing a default statement using the templating engine.
Creating a Nested Blocks Template: This topic demonstrates how to create nested blocks template using the templating engine
The following samples provide additional information related to this topic.
View on GitHub