
This topic demonstrates, with code examples, how to add the igSplitter™ control to an HTML page in either JavaScript or ASP.NET MVC.
The following table lists the concepts and topics required as a prerequisite to understanding this topic.
Topics
Using JavaScript Resouces in Ignite UI for jQuery: This topic explains how to manage the required resources to work with Ignite UI for jQuery® within a Web application.
igSplitter Overview: This topic provides conceptual information about the igSplitter control including its main features, minimum requirements, and user functionality.
This topic contains the following sections:
The igSplitter is control that initialize on DIV element with two child DIV elements with some content. You can set up the control without configuring any options. In this case, however, igSplitter will occupy the entire browser window so, unless this is exactly what you want, you should set container width and height to configure igSplitter to the desired size.

The width and height calls specify the size of the splitter on the page and their values can be specified in any unit of measure available in CSS.
The following table summarizes the requirements for igSplitter control.
| Requirement / Required Resource | Description | What you need to do | ||||||||
|---|---|---|---|---|---|---|---|---|---|---|
| jQuery and jQuery UI JavaScript resources |
Ignite UI for jQuery is built on top of these frameworks:
|
Add script references to both libraries in the head section of your page. |
||||||||
| Modernizr library (Optional) |
The Modernizr library is used by the igSplitter to detect browser and device capabilities. It is not mandatory and if not included the control will behave as if it works in a normal desktop environment with
HTML5 compatible browser.
|
Add a script reference to the library in the head section of your page. |
||||||||
| igSplitter JavaScript resources |
The igSplitter functionality of the Ignite UI for jQuery library is distributed across several files. You can load the required resources in one of the following ways:
|
Add one of the following:
|
||||||||
| IG theme (Optional) | This theme contains the visual styles for the Ignite UI for jQuery library. The theme file is: {IG CSS root}/themes/Infragistics/infragistics.theme.css | |||||||||
| igSplitter structure | The styles from the following CSS file are used for rendering various elements of the control: {IG CSS root}/structure/modules/infragistics.ui.splitter.css |
Add style reference to the file in your page.
|
Note: It is recommended to use the igLoader component to load JavaScript and CSS resources. For information on how to do this, refer to the Using Infragistics Loader topic. In addition to that, in the online Ignite UI for jQuery Samples Browser, you can find some specific examples on how to use the igLoader with the igSplitter component.
Following are the general conceptual steps for adding igSplitter to an HTML page.
Adding references to required resources
Adding the igSplitter control
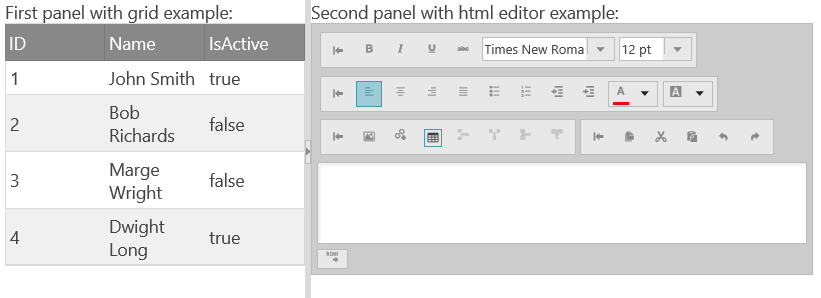
This procedure guides you through the steps of adding an igSplitter control with basic functionality to an HTML page using a pure HTML/JavaScript implementation. It uses the Infragistics Loader component to load all Ignite UI for jQuery resources needed by the igSplitter control.
The following screenshot is a preview of the final result.

The following steps demonstrate how to add a basic igSplitter control to a web page.
Add references to required resources.
Organize the required files.
A. Add the jQuery, jQueryUI, and Modernizr JavaScript resources to a folder named Scripts in the directory where your web page resides.
B. Add the Ignite UI for jQuery CSS files to a folder named Content/ig (For details, see the Styling and Theming Ignite UI for jQuery topic).
C. Add the Ignite UI for jQuery JavaScript files to a folder named Scripts/ig in your web site or application (For details, see the Using JavaScript Resources in Ignite UI for jQuery topics).
Add the references to the required JavaScript libraries.
Add references to the jQuery, jQuery UI and Modernizr libraries to the head section of your page:
In HTML:
 <script  type="text/javascript" src="Scripts/jquery.js"></script>
 <script  type="text/javascript" src="Scripts/jquery-ui.js"></script>
 <script  type="text/javascript" src="Scripts/modernizr.js"></script>
Add a reference to igLoader.Include the igLoader script in the page:
In HTML:
<script type="text/javascript" src="Scripts/ig/infragistics.loader.js"></script>
Load the required resources.
Instantiate igLoader:
In HTML:
 <script type="text/javascript">
     $.ig.loader({
         scriptPath: "Scripts/ig/",
         cssPath: "Content/ig/",
         resources: "igSplitter"
     });
 <script>
Add the igSplitter control.
Add an HTML element to host igSplitter.
Add an HTML div element to host igSplitter on the HTML page.
In HTML:
 <div id="splitter">
     <div>
         First panel with grid example: <br />
         <div id="grid"></div>
     </div>
     <div>
         Second panel with html editor example: <br />
         <div id="htmlEditor"></div>
     </div>
 </div>
Instantiate igSplitter.
Add the initialization code to a script element in the HTML page. The initialization code creates igSplitter instance in the div element added earlier.
The following code creates an instance of the igSplitter control without specifying its container’s size.
In JavaScript:
 $.ig.loader(function () {
     // Create a basic igSplitter control
     $("#splitter").igSplitter({
     });
 });
In most cases, you might want to specify the size of the instance. The following code configures the igSplitter container to be 400 x 600 pixels (width x height).
 $.ig.loader(function () {
  // Create a basic igSplitter control
  $("#splitter").igSplitter({
      width: 400,
      height: 600 });
  });
This procedure guides you through the steps of adding an igSplitter with basic functionality to an ASP.NET MVC view. The example uses the ASP.NET MVC syntax together with the required Loader configuration.
The following screenshot is a preview of the final result.
The following steps demonstrate how to add a basic igSplitter control to an ASP.NET MVC application.
Add references to required resources.
Organize the required files.
A. Add the jQuery, jQueryUI, and Modernizr JavaScript resources to a folder named Scripts in the directory where your web page resides.
B. Add the Ignite UI for jQuery CSS files to a folder named Content/ig (For details, see the Styling and Theming Ignite UI for jQuery topic).
C. Add the Ignite UI for jQuery JavaScript files to a folder named Scripts/ig in your web site or application (For details, see the Using JavaScript Resources in Ignite UI for jQuery topics).
Add the references to the required JavaScript libraries.Add references to the jQuery, jQuery UI and Modernizr libraries to the head section of your page:
In HTML:
 <script  type="text/javascript" src="Scripts/jquery.js"></script>
 <script  type="text/javascript" src="Scripts/jquery-ui.js"></script>
 <script  type="text/javascript" src="Scripts/modernizr.js"></script>
Add a reference to igLoader.Include the igLoader script in the page:
In HTML:
<script type="text/javascript" src="Scripts/ig/infragistics.loader.js"></script>
Adding the Loader MVC helper configuration for igSplitter.
Add the following code to your ASP.NET MVC view.
In ASPX:
 @(Html.Infragistics()
     .Loader()
     .ScriptPath("http://localhost/ig_ui/js/")
     .CssPath("http://localhost/ig_ui/css/")
     .Render()
 )
Add the igSplitter control.
Add an HTML element to host igSplitter.
Add an HTML div element to host igSplitter on the HTML page.
In HTML:
 <div id="splitter">
     <div>
         First panel with grid example: <br />
         <div id="grid"></div>
     </div>
     <div>
         Second panel with html editor example: <br />
         <div id="htmlEditor"></div>
     </div>
 </div>
Instantiate igSplitter. The following code creates an instance of the igSplitter control without specifying its container’s size.
 @(Html.Infragistics()
     .Splitter()
     .ID("splitter")
     .Height("300px")
     .Width("900px")
     .SplitterPanelSettings(p =>
     {
         p.AddPanel().Size("300px").Min("30px").Max("300px");
         p.AddPanel().Size("500px").Collapsible(true);
     })
     .Render()
 )
In most cases, you might want to specify the size of the instance. The following code configures the igSplitter container to be 400 x 600 pixels (width x height).
 @(Html.Infragistics()
     .ID("splitter")
     .Height("400")
     .Width("600")
     .Render()
 )
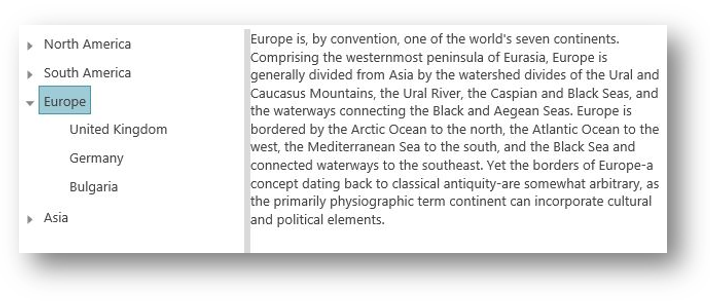
The sample will demonstrate how to use the vertical igSplitter control to manage page's layout in TypeScript.
The first container contains a igTree control with countries and continents defined as TypeScript classes.
When a node is clicked, the description for the selected item is shown in the right panel.
The following screenshot is a preview of the final result.
The following steps demonstrate how to add a basic igSplitter control using TypeScript.
Add references to required resources.
Include the Ignite UI for jQuery theme and structural files:
In HTML:
 <!-- Ignite UI for jQuery Required Combined CSS Files -->
 <link href="http://cdn-na.infragistics.com/igniteui/2025.1/latest/css/themes/infragistics/infragistics.theme.css" rel="stylesheet" />
 <link href="http://cdn-na.infragistics.com/igniteui/2025.1/latest/css/structure/infragistics.css" rel="stylesheet" />
Add the JavaScript libraries (modernizr is optional):
In HTML:
 <!-- JavaScript Library Dependencies -->
 <script src="http://modernizr.com/downloads/modernizr-latest.js"></script>
 <script src="http://code.jquery.com/jquery-1.9.1.min.js"></script>
 <script src="http://code.jquery.com/ui/1.10.3/jquery-ui.min.js"></script>
Include Ignite UI for jQuery scripts. Preferably use a custom download, but you can also check "Using JavaScript Resources in Ignite UI for jQuery" topic for other methods.
In HTML:
 <!-- Ignite UI for jQuery Required Combined JavaScript Files -->
 <script src="http://cdn-na.infragistics.com/igniteui/2025.1/latest/js/infragistics.core.js"></script>
 <script src="http://cdn-na.infragistics.com/igniteui/2025.1/latest/js/infragistics.lob.js"></script>
Add reference path to where the TypeScript file for your application is located or external resources:
In HTML:
<script src="./TypeScript/sampleApp.js"></script>
In HTML:
 <script src="http://www.igniteui.com/data-files/continents-with-countries-and-cities.js"></script>
 <script src="http://www.igniteui.com/TypeScriptSamples/splitter/typescript.js"></script>
Add the igSplitter control.
Add an HTML element to host igSplitter.
Add an HTML div element to host igSplitter on the HTML page.
In HTML:
 <div id="splitter">
     <div style="overflow: auto">
         <ul id="tree"></ul>
     </div>
     <div><p>Select a destination from tree.</p></div>
 </div>
Add data source
 var continentsWithCountries = [{
     "Text": "Europe",
     "Description": "Europe is..",
     "Countries": [{ "Text": "Bulgaria", "Description": "Bulgaria, officially .." }]
 }, {
     "Text": "Asia",
     "Description": "Asia is the world's largest..",
     "Countries": [{ "Text": "Japan", "Description": "Japan is an island.." }, { .. }]
 }, {
     "Text": "North America",
     "Description": "North America..",
     "Countries": [{ "Text": "United States", "Description": "The United States.." }]
 }];
Add ts implementation code and include the reference paths to the Ignite UI for jQuery and jQuery type definitions for TypeScript:
In TypeScript:
 /// <reference path="http://www.igniteui.com/js/typings/jquery.d.ts" />
 /// <reference path="http://www.igniteui.com/js/typings/jqueryui.d.ts" />
 /// <reference path="http://www.igniteui.com/js/typings/igniteui.d.ts" />
 declare var continentsWithCountries;

 $(function () {
     $("#splitter").igSplitter({
         height: "300px",
         panels: [{ size: 160, min: 100, max: 250 }]
     });
     $("#tree").igTree({
         dataSource: continentsWithCountries,
         bindings: {
             textKey: "Text",
             valueKey: "Text",
             childDataProperty: "Countries"
         }
     });
     $("#tree").on("igtreeselectionchanged", function (sender, eventArgs) {
         var node = eventArgs.selectedNodes[0];
         if (node.data.Description) {
             (<JQuery>$("#splitter").igSplitter("secondPanel")).html(node.data.Description);
         } else {
             (<JQuery>$("#splitter").igSplitter("secondPanel")).html("No information found.");
         }
     });
 });
The following topics provide additional information related to this topic.
Configuring igSplitter: This topic explains, with code examples, how to configure the igSplitter control.
Handling Events (igSplitter): This topic explains, with code examples, how to attach event handlers to the igSplitter control.
Accessibility Compliance (igSplitter): This topic explains the accessibility features of the igSplitter control and provides advice on how to achieve accessibility compliance for pages containing this control.
Known Issues and Limitations (igSplitter): This topic provides information about the known issues and limitations of the igSplitter control.
jQuery and MVC API Links (igSplitter): This topic provides links to the API documentation for the jQuery and its ASP.NET MVC helper class for the igSplitter control.
The following samples provide additional information related to this topic.
Basic Vertical Splitter: This sample demonstrates how to use the Splitter control to manage a page's vertical layout. The first container contains a Tree control with continents and countries. The left vertical panel has maximum and minimum ranges that a user can resize the panel. When a node is clicked, the description for the selected item is in the right panel.
Basic Horizontal Splitter: This sample demonstrates how to use the Splitter control to manage master/detail grid with horizontal layout. The first container contains a master grid with customers. After a row is clicked in master grid, in the second container is shown grid with orders that are made by this customer.
Nested Spitters: This sample demonstrates how to manage layout with nested splitters. The panel contains a Tree with continents, countries and cities. When you click on a node the map in the second splitter is centered according node's coordinates. If a country is selected, then a grid is displayed under the map with cities in that country. Panels are not resizable by default.
ASP.NET MVC Basic Usage: This example demonstrates how you can utilize the ASP.NET MVC helper for the igSplitter.
Splitter API and Events: This sample demonstrates how to handle events in the igSplitter control and API usage.
View on GitHub