
This topic shows how to use the igCombo in a basic ASP.NET MVC scenario.
The Ignite UI for MVC Combo is instantiated in a View. In addition, the ComboDataSourceAction attribute is used to process the remote request for the collection of employees as well as process the remote filtering parameters. Finally, you can see how the combo is used in a form to update a field in the model.
This topic contains the following sections:
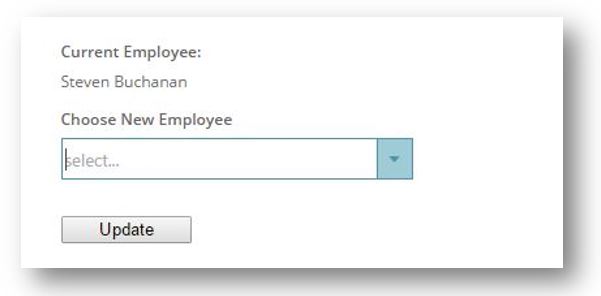
The following screenshot is a preview of the final result.
To complete the procedure, you need an ASP.NET MVC Project with the following:
This topic takes you step-by-step toward creating a Model, View and Controller.
Order classAdd the Order class
Add the Order class to your Models folder.
Create class members
Open the Order.cs file and add the following members to the class:
In C#:
 public class Order
 {
     public int OrderID { get; set; }
     public string CustomerID { get; set; }
     public Nullable<int> EmployeeID { get; set; }
     public Nullable<System.DateTime> OrderDate { get; set; }
     public Nullable<System.DateTime> RequiredDate { get; set; }
     public Nullable<System.DateTime> ShippedDate { get; set; }
     public Nullable<int> ShipVia { get; set; }
     public Nullable<decimal> Freight { get; set; }
     public string ShipName { get; set; }
     public string ShipAddress { get; set; }
     public string ShipCity { get; set; }
     public string ShipRegion { get; set; }
     public string ShipPostalCode { get; set; }
     public string ShipCountry { get; set; }
     public string ContactName { get; set; }
     public string EmployeeName { get; set; }
     public int ShipperID { get; set; }
     public string ShipperName { get; set; }
     public decimal TotalPrice { get; set; }
     public int TotalItems { get; set; }
 }
Add the Controller and the View
Create a ComboController
Create a new controller in the Controllers folder of your ASP.NET MVC application named ComboController.cs
Create the Action methods
Add two Action methods to the Controller for the purposes of creating an Order.
In C#:
 public class ComboController : Controller
 {
     //
     // GET: /Combo/

     [ComboDataSourceAction]
     [ActionName("employee-combo-data")]
     public ActionResult ComboData()
     {
         IEnumerable<Employee> employees = RepositoryFactory.GetEmployeeRepository().Get();
         return View(employees);
     }

     [ActionName("aspnet-mvc-helper")]
     public ActionResult UsingAspNetMvcHelper()
     {
         Order order = RepositoryFactory.GetOrderRepository().Get().First();
         return View("aspnet-mvc-helper", order);
     }

     [HttpPost]
     [ActionName("aspnet-mvc-helper")]
     public ActionResult UsingAspNetMvcHelper(Order updatedOrder)
     {
         ItemRepository<Order> orderRepository = RepositoryFactory.GetOrderRepository();
         ItemRepository<Employee> employeeRepository = RepositoryFactory.GetEmployeeRepository();

         Order existingOrder = orderRepository.Get(o => o.OrderID == updatedOrder.OrderID);
         Employee newEmployee = employeeRepository.Get(e => e.ID == updatedOrder.EmployeeID);

         if (existingOrder != null && newEmployee != null)
         {
             existingOrder.EmployeeID = newEmployee.ID;
             existingOrder.EmployeeName = newEmployee.Name;

             orderRepository.Update(existingOrder, o => o.OrderID == existingOrder.OrderID);
             orderRepository.Save();
         }

         return View("aspnet-mvc-helper", existingOrder);
     }

 }
Create the View
Create a strongly-typed View and use the Order class as the Model.
In ASPX:
 @using Infragistics.Web.Mvc
 @using IgniteUI.SamplesBrowser.Models
 @model IgniteUI.SamplesBrowser.Models.Northwind.Order
Add the JavaScript and CSS references.
In this example, use the combined JavaScript and CSS files referenced locally in the ASP.NET MVC application.
In ASPX:
 <link href="/Content/css/themes/infragistics/infragistics.theme.css" rel="stylesheet" type="text/css" />
 <link href="/Content/css/structure/infragistics.css" rel="stylesheet" type="text/css" />
 <script src="/Scripts/jquery.js" type="text/javascript"></script>
 <script src="/Scripts/jquery-ui.js" type="text/javascript"></script>
 <script src="/Scripts/js/infragistics.core.js" type="text/javascript"></script>
 <script src="/Scripts/js/infragistics.lob.js" type="text/javascript"></script>

 ...

 <style>

     .sample-ui div {
         margin-bottom: 1em;
     }

     .sample-ui h4 {
         margin-bottom: .5em;
     }

     .sample-ui #submitBtn {
         width: 100px;
     }

 </style>
Create a form for the Order object.
In ASPX:
 @using (Html.BeginForm())
 {
     <div class="sample-ui">
         @Html.HiddenFor(item => item.OrderID)

         <div>
             <h4>Current Employee:</h4>
             @Html.DisplayFor(item => item.EmployeeName)
         </div>

         <div>
             <h4>Choose New Employee</h4>

             @(Html.Infragistics().ComboFor(item => item.EmployeeID)
                 .Width("270px")
                 .DataSource(Url.Action("employee-combo-data"))
                 .ValueKey("ID")
                 .TextKey("Name")
                 .DataBind()
                 .Render()
             )
         </div>

         <input id="submitBtn" type="submit" value="Update" />
     </div>
 }
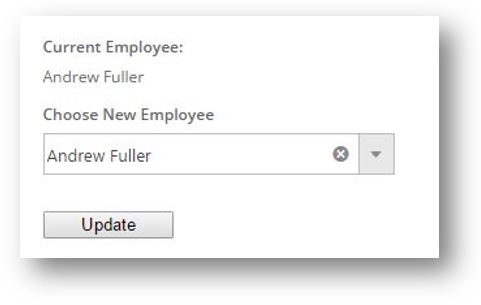
Run the sample and select an item from the dropdown. After that click on "Update" button in order to update the current employee value.
igCombo control as well as other details related to data binding.View on GitHub