
This topic demonstrates how to create basic column template for the igGrid™ control.
This topic contains the following sections:
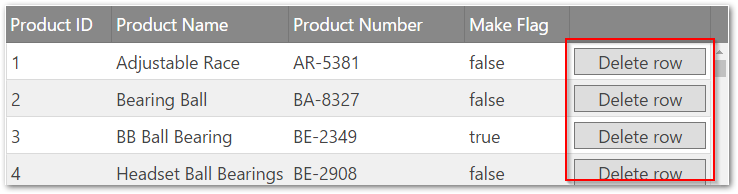
In this example a basic column template is applied to the grid. An extra unbound column is added to the grid. It has a template that renders a button in its cells.
The following screenshot is a preview of the final result. Only the column with red outline has column template assigned.
To complete the procedure you need an empty html page.
The following steps demonstrate how to create a basic column template in the igGrid
Prepare html page
To prepare the html page, add an igLoader and configure it to load igGrid resources.
In Javascript:
    <script src="http://localhost/ig_ui/js/infragistics.loader.js"></script>
    <script type="text/javascript">
         $.ig.loader({
            scriptPath: "http://localhost/ig_ui/js/",
            cssPath: "http://localhost/ig_ui/css/",
            resources: "igGrid"
        });
    </script>
Add and apply the column template
Add sample data to the page and table tag to the body of the page.
In Javascript:
<script src="http://www.igniteui.com/data-files/adventureworks.min.js"></script>
In HTML:
 <body>
     <table id="grid1"></table>
 </body>
2. Add igGrid with column templates set.
In Javascript:
     <script type="text/javascript">
     $.ig.loader(function () {
         $("#grid").igGrid({
             autoGenerateColumns: false,
             width: "100%",
             height: "500px",
             columns: [
                 { headerText: "Product ID", key: "ProductID", dataType: "number", width: "15%" },
                 { headerText: "Product Name", key: "Name", dataType: "string", width: "25%" },
                 { headerText: "Product Number", key: "ProductNumber", dataType: "string", width: "25%" },
                 { headerText: "Make Flag", key: "MakeFlag", dataType: "bool", width: "15%" },
                 {
                     headerText: "",
                     key: "Delete",
                     dataType: "string",
                     width: "20%",
                     unbound: true,
                     template: "<input type='button' onclick='deleteRow(${ProductID})' value='Delete row' class='delete-button'/>"
                 }
             ],
             primaryKey: "ProductID",
             dataSource: adventureWorks
         });
     });
     </script>
Create the function that deletes the row
In Javascript:
 <script type="text/javascript">
     function deleteRow(rowId) {
         var grid = $("#grid").data("igGrid");
         grid.dataSource.deleteRow(rowId);
         grid.commit();
     }
 </script>
Verify the result
Look at the sample below to preview the result.
The following topics provide additional information related to this topic.
View on GitHub