
This topic will explain how to bind the igGrid™ to a Web API Service.
The following list includes links to topics useful as background information for understanding this topic.
This topic contains the following sections:
Binding the igGrid to an MVC4 Web API is a two stage process:
By default, Web API supports JSON, XML, and form-url-encoded data serialization. The $.ig.RESTDataSource supports JSON serialization by default. JSON is used in this example.
Following are the general requirements for binding to an ASP.NET MVC 4 Web API.
Following are the general conceptual steps for binding to an ASP.NET MVC 4 Web API.
This sample explains how to bind the igGrid and enable REST updating.
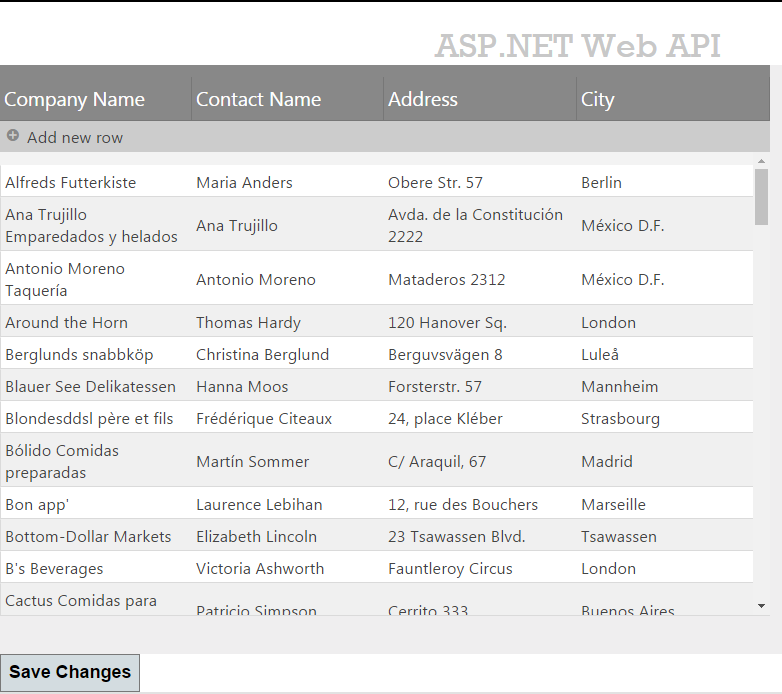
The example is using data from the Customers table of the Northwind database.
The following screenshot is a preview of the final result.
To complete the procedure, you need the following:
The following steps demonstrate how to bind igGrid to MVC 4 Web API.
Create the project
Add a reference to the Infragistics.Web.Mvc.dll
Infragistics.Web.Mvc.dll from the .NET tab or alternatively Browse for it.Add reference to Ignite UI for jQuery Scripts
_Layout.cshtml file under the Views\Shared folder add the reference to Infragistics loaderIn HTML:
<script src="http://ajax.aspnetcdn.com/ajax/modernizr/modernizr-2.8.3.js"></script>
<script src="http://code.jquery.com/jquery-1.11.3.min.js"></script>
<script src="http://code.jquery.com/ui/1.11.1/jquery-ui.min.js"></script>
<script src="~/Scripts/Infragistics/js/infragistics.loader.js"></script>
In the _Layout.cshtml file under Views\Shared folder delete the following lines
In C#:
@Scripts.Render("~/bundles/modernizr")
@Scripts.Render("~/bundles/jquery")
Add an ADO.NET Entity Data Model for the Customers tables in the Northwind Database and name it NorthwindModel.
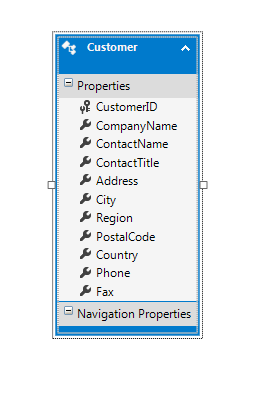
You only need a subset of the Customer fields so create a separate class which hold only the data needed for this example.
Customer classCustomer.csAdd the following properties to the Customer.cs file:
In C#:
public class Customer
{
    public string CustomerID { get; set; }
    public string CompanyName { get; set; }
    public string ContactName { get; set; }
    public string Address { get; set; }
    public string City { get; set; }
}
Replace the Index action method with the following code:
In C#:
public ActionResult Index()
{
    NorthwindModel.NorthwindEntities db = new NorthwindModel.NorthwindEntities();
    var customers = from c in db.Customers
                    select new Customer() { CustomerID = c.CustomerID, CompanyName = c.CompanyName, ContactName = c.ContactName, City = c.City, Address = c.Address };
    return View(customers.AsQueryable());
}
Enable REST support by setting the Rest property to true. Also, define the RestSettings property and the Updating feature.
Define a strongly typed model
In C#:
@model IQueryable<igGridRESTSample.Models.Customer>
Reference the Infragistics.Web.Mvc.dll assembly
In C#:
@using Infragistics.Web.Mvc
Define the Infragistics loader
In C#:
@Html.Infragistics().Loader().ScriptPath("~/Scripts/Infragistics/js/").CssPath("~/Scripts/Infragistics /css/").Render()
Note: You must change the
ScriptPathandCssPathto match your Ignite UI for jQuery file locations.
Define the grid:
In C#:
@(Html.Infragistics().Grid(Model).
    ID("grid1").
    AutoCommit(true).
    AutoGenerateColumns(false).
    AutoGenerateLayouts(false).
    Height("500px").
    Width("700px").
    ResponseDataKey(null).
    PrimaryKey("CustomerID").
    Rest(true).
    Columns(column =>
    {
        column.For(x => x.CustomerID).HeaderText("Customer ID").DataType("string").Hidden(true);
        column.For(x => x.CompanyName).HeaderText("Company Name").DataType("string");
        column.For(x => x.ContactName).HeaderText("Contact Name").DataType("string");
        column.For(x => x.Address).HeaderText("Address").DataType("string");
        column.For(x => x.City).HeaderText("City").DataType("string");
    }).
    RestSettings(rest =>
    {
        rest.RestSetting().Create(r => r.RestVerbSetting().Url("/api/customers/").Batch(false)).
        Update(r => r.RestVerbSetting().Url("/api/customers/").Batch(false)).
        Remove(r => r.RestVerbSetting().Url("/api/customers/").Batch(false));
    }).
    Features(f => f.Updating()).
    DataSourceUrl("/api/customers/").
    Render())
Add a new empty Web API controller to the Controllers folder and name it CustomersController.cs.
Note: The difference between normal ASP.NET MVC controllers and Web API controllers is that the former inherit from the Controller class and the later inherit from the
ApiControllerclass.
In C#:
private NorthwindModel.NorthwindEntities db = new NorthwindModel.NorthwindEntities();
Add a new method to the CustomersController to handle the grid’s GET requests:
In C#:
public IEnumerable<Customer> GetCustomers()
{
    var customers = from c in db.Customers
                    select new Customer() { CustomerID = c.CustomerID, CompanyName = c.CompanyName, ContactName = c.ContactName, City = c.City, Address = c.Address };
    return customers;
}
In the GetCustomers method, wrap the data from the Customers table in the Customer object defined earlier.
Note: For the sake of simplicity, this example doesn’t use the Repository design pattern but instead directly accesses the Entity Framework API to modify the data store.
Add the new method to the CustomersController to handle the grid’s PUT requests:
In C#:
public HttpResponseMessage PutCustomer(string id, Customer customer)
{
    if (ModelState.IsValid && id == customer.CustomerID)
    {
        NorthwindModel.Customer changedCustomer = new NorthwindModel.Customer()
        {
            CustomerID = customer.CustomerID,
            CompanyName = customer.CompanyName,
            ContactName = customer.ContactName,
            Address = customer.Address,
            City = customer.City
        };
        db.Customers.Attach(changedCustomer);
        db.ObjectStateManager.ChangeObjectState(customer, EntityState.Modified);
        try
        {
            db.SaveChanges();
        }
        catch (DbUpdateConcurrencyException)
        {
            return Request.CreateResponse(HttpStatusCode.NotFound);
        }
        return Request.CreateResponse(HttpStatusCode.OK, customer);
    }
    else
    {
        return Request.CreateResponse(HttpStatusCode.BadRequest);
    }
}
The PutCustomer method is executed when there is a PUT request, i.e. when a customer is updated. The id parameter is mapped according to the {id} placeholder in the route template. The Customer parameter is constructed from the default model binder.
The default model binder is checked for errors using the ModelState.IsValid property. If the model is valid then a new Customer instance is attached to the Customers entity and its object state is set to EntityState.Modified. Finally the changed customer is saved to the database by calling the SaveChanges method and a proper status code is sent to the client as described in the REST specification.
Add a new method to the CustomersController to handle the grid’s POST requests:
In C#:
public HttpResponseMessage PostCustomer(Customer customer)
{
    if (ModelState.IsValid)
    {
        NorthwindModel.Customer newCustomer = new NorthwindModel.Customer() {
            CustomerID = customer.CustomerID,
            CompanyName = customer.CompanyName,
            ContactName = customer.ContactName,
            Address = customer.Address,
            City = customer.City
        };
        db.Customers.AddObject(newCustomer);
        db.SaveChanges();
        HttpResponseMessage response = Request.CreateResponse(HttpStatusCode.Created, customer);
        response.Headers.Location = new Uri(Url.Link("DefaultApi", new { id = customer.CustomerID }));
        return response;
    }
    else
    {
        return Request.CreateResponse(HttpStatusCode.BadRequest);
    }
}
The PostCustomer method is executed when there is a POST request i.e. a new customer is created. The Customer parameter is constructed from the default model binder.
The default model binder is checked for errors using the ModelState.IsValid property. If the model is valid, then a new Customer instance is attached to the Customers entity with the AddObject method.
Finally, the customer is saved to the database by calling the SaveChanges method and a proper status code is sent to the client as described in the REST specification.
Add new method to the CustomersController which will handle grid’s DELETE requests:
In C#:
public HttpResponseMessage DeleteCustomer(string id)
{
    NorthwindModel.Customer customer = db.Customers.Single(c => c.CustomerID == id);
    if (customer == null)
    {
        return Request.CreateResponse(HttpStatusCode.NotFound);
    }
    db.Customers.DeleteObject(customer);
    try
    {
        db.SaveChanges();
    }
    catch (DbUpdateConcurrencyException)
    {
        return Request.CreateResponse(HttpStatusCode.NotFound);
    }
    return Request.CreateResponse(HttpStatusCode.OK, customer);
}
The DeleteCustomer method is executed when there is a DELETE request, i.e. a customer is deleted. The id parameter is mapped according to the {id} placeholder in the route template.
In the method, the customer is extracted from the Customers entity by its CustomerID and passed to the DeleteObject method. Finally, the SaveChanges method deletes the customer from the database and the proper status code is sent to the client.
Add a button and attach an event handler for it's click event. In it call the igGrid's saveChanges method to send the pending changes to the server.
<button id="saveBtn">Save Changes</button>
    $("#saveBtn").click(function () {
        $("#grid1").igGrid("saveChanges");
    });
The changes will be send to the server in REST format and the previously specified controller actions will proccess them and save the data to the database.
The following topics provide additional information related to this topic.
The following material (available outside the Infragistics family of content) provides additional information related to this topic.
View on GitHub