
This topic explains how to configure the igHierarchicalGrid™ Multi-Column Headers feature.
The following topics are prerequisites to understanding this topic:
This topic contains the following sections:
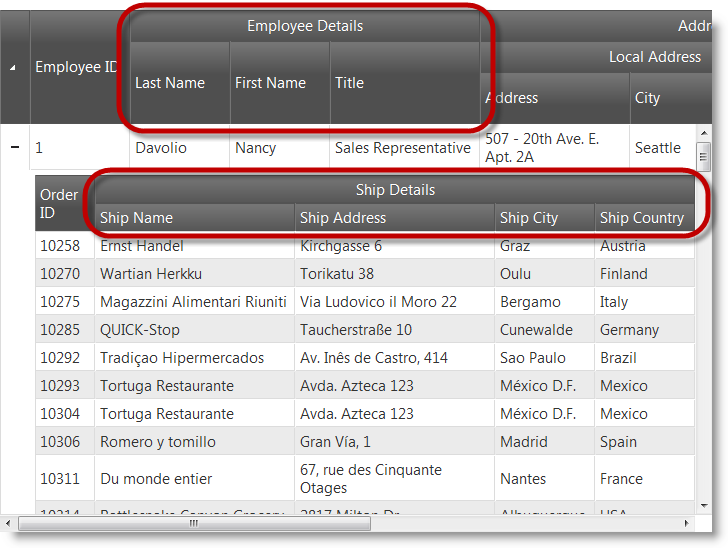
The multi-column headers feature provides header grouping functionality. In the columns array, each object has a new option called group. This option accepts an array of column definitions. The group option is cascading meaning that you can group multi-column headers together. When defining a grouped column, you can set the headerText, key and the rowspan options. The headerText option is used to set the group caption, key is used to identify the column group, and rowspan is used to adjust the span of the group header cell. The feature functionality is exposed off of the objects in the columns array. However as with other features, you must add the multi-column headers feature to the features array and also reference the necessary JavaScript files specific for the feature. In the following screenshot there is a multi-column header configured for the FirstName, LastName and Title columns in the root layout of the igHierarchicalGrid. In the child layout, there is a multi-column header configured for the ShipName, ShipAddress, ShipCity and ShipCountry columns.
Note: You can use hierarchical grid
columnsoption API$('.selector').igHierarchicalGrid('option', 'columns')andcolumnLayoutsoption API$('.selector').igHierarchicalGrid('option', 'columnLayouts')to get multi-column headers hierarchy.
This procedure guides you through the process of configuring multi-column headers in the igHierarchicalGrid.
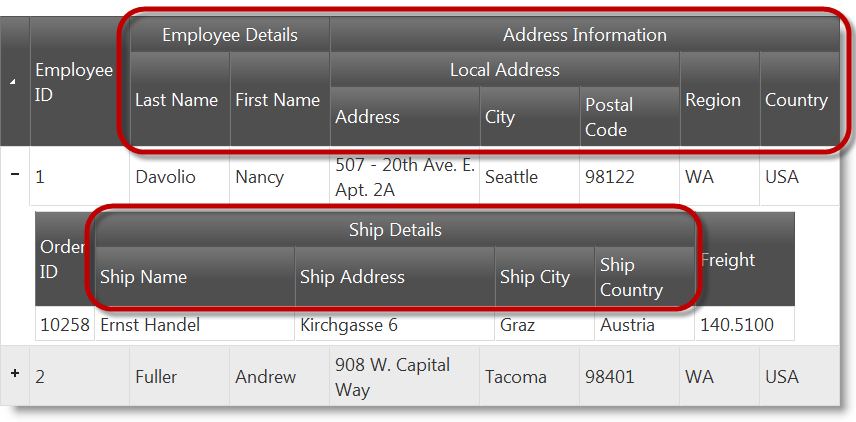
The following screenshot is a preview of the final result.
The following steps demonstrate how to configure multi-column headers in the igHierarchicalGrid.
Reference the required JavaScript and CSS files.
This code snippet uses the Infragistics loader to reference the Multi-Column Headers feature
In HTML:
 <script src="jquery.min.js" type="text/javascript"></script>
 <script src="jquery-ui.min.js" type="text/javascript"></script>
 <script src="infragistics.loader.js"></script>
In JavaScript:
 <script type="text/javascript">
     $.ig.loader({
         scriptPath: "http://localhost/ig_ui/js/",
         cssPath: "http://localhost/ig_ui/css/",
         resources: "igHierarchicalGrid.MultiColumnHeaders"
     });
 </script>
Define the sample data.
Next, a JavaScript array of objects is created to bind to the igHierarchicalGrid.
In JavaScript:
 var northwind = [{
       "EmployeeID": 1,
       "LastName": "Davolio",
       "FirstName": "Nancy",
       "Title": "Sales Representative",
       "TitleOfCourtesy": "Ms.",
       "BirthDate": "/Date(-664761600000)/",
       "HireDate": "/Date(704678400000)/",
       "Address": "507 - 20th Ave. E.rnApt. 2A",
       "City": "Seattle",
       "Region": "WA",
       "PostalCode": "98122",
       "Country": "USA",
       "HomePhone": "(206) 555-9857",
       "Extension": "5467",
       "Notes": "Education includes a BA in psychology from Colorado State University in 1970.",
       "ReportsTo": 2,
       "PhotoPath": "http://accweb/emmployees/davolio.bmp",
       "Orders": [{
                   "OrderID": 10258,
                   "CustomerID": "ERNSH",
                   "EmployeeID": 1,
                   "OrderDate": "/Date(837561600000)/",
                   "RequiredDate": "/Date(839980800000)/",
                   "ShippedDate": "/Date(838080000000)/",
                   "ShipVia": 1,
                   "Freight": "140.5100",
                   "ShipName": "Ernst Handel",
                   "ShipAddress": "Kirchgasse 6",
                   "ShipCity": "Graz",
                   "ShipRegion": null,
                   "ShipPostalCode": "8010",
                   "ShipCountry": "Austria"
             }
     ]}, {
       "EmployeeID": 2,
       "LastName": "Fuller",
       "FirstName": "Andrew",
       "Title": "Vice President, Sales",
       "TitleOfCourtesy": "Dr.",
       "BirthDate": "/Date(-563846400000)/",
       "HireDate": "/Date(713750400000)/",
       "Address": "908 W. Capital Way",
       "City": "Tacoma",
       "Region": "WA",
       "PostalCode": "98401",
       "Country": "USA",
       "HomePhone": "(206) 555-9482",
       "Extension": "3457",
       "Notes": "Andrew received his BTS commercial in 1974.",
       "ReportsTo": null,
       "PhotoPath": "http://accweb/emmployees/fuller.bmp",
       "Orders": [{
                   "OrderID": 10265,
                   "CustomerID": "BLONP",
                   "EmployeeID": 2,
                   "OrderDate": "/Date(838252800000)/",
                   "RequiredDate": "/Date(840672000000)/",
                   "ShippedDate": "/Date(839808000000)/",
                   "ShipVia": 1,
                   "Freight": "55.2800",
                   "ShipName": "Blondel pu00e8re et fils",
                   "ShipAddress": "24, place Klu00e9ber",
                   "ShipCity": "Strasbourg",
                   "ShipRegion": null,
                   "ShipPostalCode": "67000",
                   "ShipCountry": "France"
         }
     ]}];
Define the HTML placeholder
In HTML:
<table id="grid1"></table>
Instantiate the igHierarchicalGrid
In the following code, there are two groups defined in the root layout. The first is named Employee Details which contains the LastName and FirstName columns.
The second is called Address Information and includes the Country and Region columns as well as another group column. The inner group is named Local Address and contains the Address, City and PostalCode columns.
In the Orders layout, there is one multi-column header group. Its name is Ship Details and contains the ShipName, ShipAddress, ShipCity and ShipCountry columns.
In JavaScript:
 $.ig.loader(function () {
     $("#grid1").igHierarchicalGrid({
         features: [
             {
                 name: "MultiColumnHeaders",
                 inherit: true
             }
         ],
         initialDataBindDepth: -1,
         dataSource: northwind,
         autoGenerateColumns: false,
         primaryKey: "EmployeeID",
         columns: [
             { key: "EmployeeID", headerText: "Employee ID", dataType: "number", width: "100px" },
             { headerText: "Employee Details",
                 group: [
                     { key: "LastName", headerText: "Last Name", width: "100px" },
                     { key: "FirstName", headerText: "First Name", width: "100px" }
                 ]
             },
             { headerText: "Address Information",
             group: [
                 { headerText: "Local Address",
                 group: [
                 { headerText: "Address", key: "Address", width: "150px" },
                 { headerText: "City", key: "City", width: "100px" },
                 { headerText: "Postal Code", key: "PostalCode", width: "100px" }
                 ]},
                 { headerText: "Region", key: "Region", width: "80px" },
                 { headerText: "Country", key: "Country", width: "80px" }
             ]}
         ],
         childrenDataProperty: "Orders",
         autoGenerateLayouts: false,
         columnLayouts: [
             {
                 key: "Orders",
                 autoGenerateColumns: false,
                 primaryKey: "OrderID",
                 columns: [
                     { key: "OrderID", headerText: "Order ID", width: "60px" },
                     { headerText: "Ship Details",
                         group: [
                             { key: "ShipName", headerText: "Ship Name", width: "200px" },
                             { key: "ShipAddress", headerText: "Ship Address", width: "200px" },
                             { key: "ShipCity", headerText: "Ship City", width: "100px" },
                             { key: "ShipCountry", headerText: "Ship Country", width: "100px" }
                         ]
                     },
                     { key: "Freight", headerText: "Freight", width: "100px" }
                 ]
             }
         ]
     });
 });
This procedure guides you through the process of configuring multi-column headers in the igHierarchicalGrid.
The following screenshot is a preview of the final result.
To complete the procedure, you need the following:
The following steps demonstrate how to configure multi-column headers in the igHierarchicalGrid.
1. Reference the required JavaScript and CSS files.
In the Index.cshtml View, add the required JavaScript references and instantiate the Infragistics loader.
The following code snippet is using the Infragistics loader to reference the Multi-Column Headers feature
In HTML:
<script src="jquery.min.js" type="text/javascript"></script>
<script src="jquery-ui.min.js" type="text/javascript"></script>
<script src="infragistics.loader.js"></script>
In C#:
@Html.Infragistics()
.Loader()
.ScriptPath("http://localhost/ig_ui/js/")
.CssPath("http://localhost/ig_ui/css/")
.Resources("igGrid.MultiColumnHeaders")
.Render()
2. Define the model
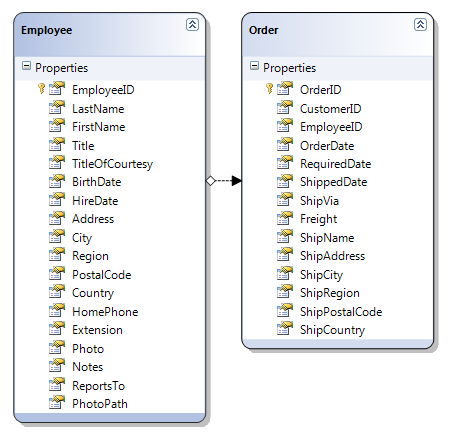
Add an ADO.NET Entity Data Model for the Employees and Orders tables in the Northwind Database and name it NorthwindModel.
3. Define the view
Open the Index.cshtml View and add the code below.
In the code, there are two groups defined in the root layout. The first is named Employee Details and contains the LastName and FirstName columns.
The second is called Address Information and includes the Country and Region columns as well as another group column. The inner group is named Local address and contains the Address, City and PostalCode columns.
In the Orders layout there is one multi-column header group. Its name is Ship Details and contains the ShipName, ShipAddress, ShipCity and ShipCountry columns.
In C#:
@Html.Infragistics().Grid(Model)
.ID("grid1")
.LoadOnDemand(false)
.AutoGenerateLayouts(false)
.AutoGenerateColumns(false)
.ColumnLayouts(layouts =>
{
    layouts.For(x => x.Orders)
    .AutoGenerateColumns(false)
    .AutoGenerateLayouts(false)
    .Columns(cols =>
    {
        cols.For(x => x.OrderID).Width("100px").HeaderText("Order ID");
        cols.MultiColumnHeader().HeaderText("Ship Details").Group(c =>
        {
            c.For(x => x.ShipName).Width("200px").HeaderText("Ship Name");
            c.For(x => x.ShipAddress).Width("200px").HeaderText("Ship Address");
            c.For(x => x.ShipCity).Width("100px").HeaderText("Ship City");
            c.For(x => x.ShipCountry).Width("100px").HeaderText("Ship Country");
        });
        cols.For(x => x.Freight).Width("100px").HeaderText("Freight");
    })
    .Features(feature =>
    {
        feature.MultiColumnHeaders();
    });
})
.Columns(cols =>
{
    cols.For(x => x.EmployeeID).Width("100px").HeaderText("Employee ID");
    cols.MultiColumnHeader().HeaderText("Employee Details").Group(c =>
    {
        c.For(x => x.LastName).Width("100px").HeaderText("Last Name");
        c.For(x => x.FirstName).Width("100px").HeaderText("FirstName");
    });
    cols.MultiColumnHeader().HeaderText("Address Information").Group(c =>
    {
        c.MultiColumnHeader().HeaderText("Local Address").Group(c2 =>
        {
            c2.For(x => x.Address).Width("150px").HeaderText("Address");
            c2.For(x => x.City).Width("100px").HeaderText("City");
            c2.For(x => x.PostalCode).Width("100px").HeaderText("Postal Code");
        });
        c.For(x => x.Region).Width("80px").HeaderText("Region");
        c.For(x => x.Country).Width("100px").HeaderText("Country");
    });
})
.Features(feature =>
{
    feature.MultiColumnHeaders();
})
.Height("500px")
.Width("100%")
.DataBind()
.Render()
4. Define the controller
In the Home controller’s Index action method, extract the Employees and Orders data from the Northwind database and return it with the view:
In C#:
public ActionResult Index()
{
    var dataContext = new NorthwindDataContext();
    var employees = dataContext.Employees.AsQueryable();
    return View(employees);
}
The following topics provide additional information related to this topic.
View on GitHub