
This topic explains how to add the igSparkline™ to an HTML page and bind to a JavaScript array.
The following table lists the concepts, topics, and articles required as a prerequisite to understanding this topic.
Topics
igSparkline Overview: This topic provides an overview of the igSparkline control, its benefits, and the supported chart types.
Adding igSparkline Overview: This topic provides an overview of the various ways of adding igSparkline™ to an application.
Adding Required Resources Manually: This topic explains the organization of JavaScript resources in Ignite UI for jQuery®.
Using JavaScript Resources in Ignite UI for jQuery: This topic provides general guidance on adding required JavaScript resources to use controls from the Ignite UI for jQuery library.
External Resources
This topic contains the following sections:
The igSparkline is a data-bound control requiring a set of data objects to render. The control requires an HTML element, a DIV, to serve as the base for instantiation.
The data source is specific through the dataSource option. This example defines the data in-line with the HTML. The array is obtainable through an AJAX call, an external JavaScript file, or any other means of retrieving JavaScript array data.
The igSparkline is configured in a function for document ready which fires once the document has finished loading resources.
The following table summarizes the requirements for using the igSparkline control.
| Requirement/Required Resources | Description | What you need to do… | ||||||||||||||||||||
|---|---|---|---|---|---|---|---|---|---|---|---|---|---|---|---|---|---|---|---|---|---|---|
| IG Theme | This theme contains the visual styles for the Ignite UI for jQuery library. The theme file is: css/themes/Infragistics/infragistics.theme.css | |||||||||||||||||||||
igSparkline CSS resource files
|
The styles from the following CSS file are used for rendering various elements of the control:
|
Add style reference to the file in your page.
|
||||||||||||||||||||
| Modernizr library (Optional) | The Modernizr library is used by the igSparkline to detect browser and device capabilities. It is not mandatory and, if not included, the control will behave as if in a normal desktop environment with an HTML5 compatible browser. |
Add a script reference to the library in the <head> section of your page.
|
||||||||||||||||||||
| jQuery and jQuery UI JavaScript resources | Ignite UI for jQuery is built on top of the following frameworks: |
Add script references to both libraries in the <head> section of your page.
|
||||||||||||||||||||
General igSparkline JavaScript Resources
|
The igSparkline functionality of the Ignite UI for jQuery library is distributed across several files. You can load the required resources in one of the following ways:
igLoader).
|
Add one of the following:
|
Following are the general conceptual steps for adding an igSparkline to an HTML document.
Reference the required JavaScript and CSS files.
Create a target element for the igSparkline.
Define the JavaScript array.
Instantiate the igSparkline in document ready.
Configure basic rendering options.
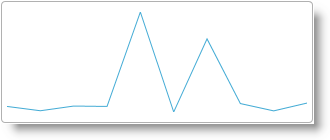
This procedure adds a basic igSparkline to an HTML page and configures basic options to supply data and configure height and width. The igSparkline shows the total amount each order placed over a period of time.
The data structure contains an ExtendedPrice field containing the amount of the order and an OrderDate field containing the date of the order purchase. The valueMemberPath of the igSparkline is set to the ExtendedPrice and the labelMemberPath is set to the OrderDate.
The following screenshot is a preview of the result.
A blank HTML document.
Reference the required JavaScript and CSS files.
Create a target element for the igSparkline.
Define the JavaScript array.
Instantiate the igSparkline in document ready.
Configure basic rendering options.
Follow these steps to add an igSparkline to an HTML document.
Referencing the required JavaScript and CSS files.
Setup the HTML document with the JavaScript and CSS file dependencies.
In HTML:
```html
<!DOCTYPE html>
<html>
<head>
    <title></title>
    <!-- Ignite UI for jQuery Required Combined CSS Files -->
    <link href="../../igniteui/css/themes/infragistics/infragistics.theme.css" rel="stylesheet" />
    <link href="../../igniteui/css/structure/infragistics.css" rel="stylesheet" />
    <script src="../../js/modernizr.min.js"></script>
    <script src="../../js/jquery.min.js"></script>
    <script src="../../js/jquery-ui.min.js"></script>
    <!-- Ignite UI for jQuery Required Combined JavaScript Files -->
    <script src="../../igniteui/js/infragistics.core.js"></script>
    <script src="../../igniteui/js/infragistics.dv.js"></script>
</head>
<body>
</body>
</html>
```
Creating a target element for the igSparkline.
Create a DIV element within the HTML body on which to instantiate the igSparkline widget.
In HTML:
 <body>
     <!-- Target element for the igSparkline -->
     <div id="sparkline"></div>
 …
Defining the JavaScript array.
Define the JavaScript array.
In HTML:
 <body>
 <script>
 var invoices = [
     {"OrderDate": "/Date(836452800000)/", "ExtendedPrice": 168.0000},
     { "OrderDate": "/Date(836452800000)/", "ExtendedPrice": 98.0000},
     { "OrderDate": "/Date(836452800000)/", "ExtendedPrice": 174.0000},
     { "OrderDate": "/Date(836539200000)/", "ExtendedPrice": 167.4000},
     { "OrderDate": "/Date(836539200000)/", "ExtendedPrice": 1696.0000},
     { "OrderDate": "/Date(836798400000)/", "ExtendedPrice": 77.0000},
     { "OrderDate": "/Date(836798400000)/", "ExtendedPrice": 1261.4000},
     { "OrderDate": "/Date(836798400000)/", "ExtendedPrice": 214.2000},
     { "OrderDate": "/Date(836798400000)/", "ExtendedPrice": 95.7600},
     { "OrderDate": "/Date(836798400000)/","ExtendedPrice": 222.3000}
 ];
 </script>
 </body>
Instantiate the igSparkline in document ready.
Use the selector of the target element defined previously to instantiate the widget.
In HTML:
 <script>
         $(function () {
             $("#sparkline").igSparkline({
             });
         });
 </script>
Configuring basic rendering options.
When instantiating the igSparkline, configure the dataSource, valueMemberPath, labelMemberPath, height, and width options.
In HTML:
 $("#sparkline").igSparkline({
     dataSource: invoices,
     height: "100px",
     width: "300px",
     valueMemberPath: 'ExtendedPrice',
     labelMemberPath: 'OrderDate'
 });
Full Code:
In HTML:
<!DOCTYPE html>
<html>
<head>
    <title></title>
    <!-- Ignite UI for jQuery Required Combined CSS Files -->
    <link href="../../igniteui/css/themes/infragistics/infragistics.theme.css" rel="stylesheet" />
    <link href="../../igniteui/css/structure/infragistics.css" rel="stylesheet" />
    <script src="../../js/modernizr.min.js"></script>
    <script src="../../js/jquery.min.js"></script>
    <script src="../../js/jquery-ui.min.js"></script>
    <!-- Ignite UI for jQuery Required Combined JavaScript Files -->
    <script src="../../igniteui/js/infragistics.core.js"></script>
    <script src="../../igniteui/js/infragistics.dv.js"></script>
</head>
<body>
    <!-- Target element for the igSparkline -->
    <div id="sparkline"></div>
    <script>
        var invoices = [
            {"OrderDate": "/Date(836452800000)/", "ExtendedPrice": 168.0000},
            { "OrderDate": "/Date(836452800000)/", "ExtendedPrice": 98.0000},
            { "OrderDate": "/Date(836452800000)/", "ExtendedPrice": 174.0000},
            { "OrderDate": "/Date(836539200000)/", "ExtendedPrice": 167.4000},
            { "OrderDate": "/Date(836539200000)/", "ExtendedPrice": 1696.0000},
            { "OrderDate": "/Date(836798400000)/", "ExtendedPrice": 77.0000},
            { "OrderDate": "/Date(836798400000)/", "ExtendedPrice": 1261.4000},
            { "OrderDate": "/Date(836798400000)/", "ExtendedPrice": 214.2000},
            { "OrderDate": "/Date(836798400000)/", "ExtendedPrice": 95.7600},
            { "OrderDate": "/Date(836798400000)/","ExtendedPrice": 222.3000}
        ];
    $(function () {
        $("#sparkline").igSparkline({
            dataSource: invoices,
            height: "100px",
            width: "300px",
            valueMemberPath: 'ExtendedPrice',
            labelMemberPath: 'OrderDate'
        });
    });
    </script>
</body>
</html>
The following topics provide additional information related to this topic.
Adding igSparkline to an ASP.NET MVC View: This topic walks through instantiating an igSparkline in an ASP.NET MVC view and bind to a .NET collection of objects.
jQuery and ASP.NET MVC Helper Links (igSparkline): This topic provides links to the API documentation for jQuery and ASP.NET MVC helper class for the igSparkline control.
The following sample provides additional information related to this topic.
View on GitHub