
This topic explains how to use the updating feature of the igGrid™ control in combination with the Row Edit Dialog.
By design editorsTemplate is executed for each column in the grid`s column collection, while the dialogTemplate is rendered against the currently edited record.
The following table lists the topics and articles required as a prerequisite to understanding this topic.
igGrid Overview: The igGrid is a jQuery-based client-side grid that is responsible for presenting and manipulating tabular data. Its whole lifecycle is on the client-side, which makes it independent from server-side technology.
Updating Overview (igGrid): This topic explains how to use the updating feature of the igGrid™ control.
igTemplating: This topic explains how to use the Infragistics® Templating Engine.
This topic contains the following sections:
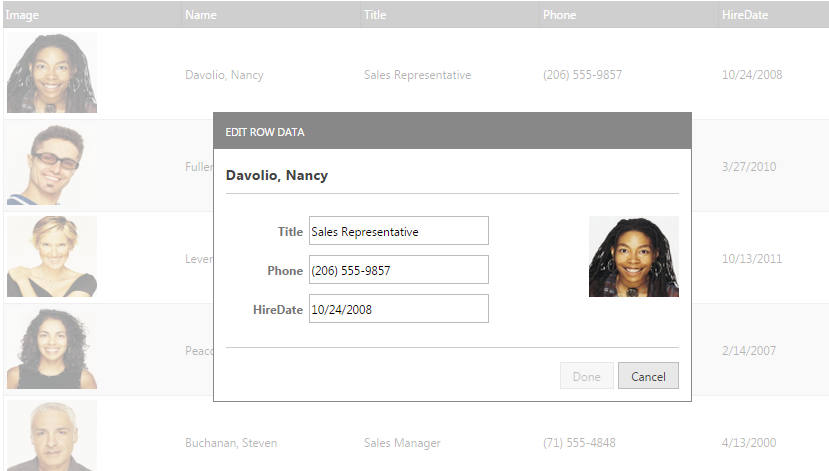
The Row Edit Dialog allows users to edit records in a pop up dialog, as compared to inline editing.
The feature is implemented as part of the igGridUpdating widget. The editMode option has a new value: “dialog”, to enable the row edit dialog. The new dialog uses a different templating structure and allows building complex custom editing dialog.
The row template itself can be defined by setting different properties in the newly added rowEditDialogOptions option. These options are listed in the following table:
| Options | Description |
|---|---|
| animationDuration | Specifies the animation duration for the opening and closing operations. |
| dialogTemplate | Specifies a template to be rendered against the currently edited record. |
| dialogTemplateSelector | Specifies a selector to a template rendered against the currently edited record. |
| editorsTemplate | Specifies a template to be executed for each column in the grid's column collection (or just the read-write columns if showReadonlyEditors is false). Decorate the element to be used as an editor with 'data-editor-for-${key}'.The ${key} template tag should be replaced with the chosen templating engine's syntax for rendering values. If any editors for columns are specified in the dialog markup they will be exluded from the data the template will be rendered for.This property is ignored if the dialog template does not include an element with the "data-render-tmpl" attribute. If both editorsTemplate and editorsTemplateSelector are specified, editorsTemplateSelector will be used. |
| editorsTemplateSelector | Specifies a selector to a template to be executed for each column in the grid's column collection. Decorate the element to be used as an editor with 'data-editor-for-${key}'. The ${key} template tag should be replaced with the chosen templating engine's syntax for rendering values. If any editors for columns are specified in the dialog markup they will be exluded from the data the template will be rendered for. This property is ignored if the dialog markup does not include an element with the 'data-render-tmpl' attribute. If both editorsTemplate and editorsTemplateSelector are specified, editorsTemplateSelector will be used. |
| namesColumnWidth | Controls the width of the column containing the column names in the default row edit dialog. |
| showEditorsForHiddenColumns | Controls if editors should be rendered for hidden columns. |
| width | Controls the default row edit dialog width. |
| height | Controls the default row edit dialog height. |
| showDoneCancelButtons | Controls the visibility of the done and cancel buttons for the dialog. If disabled the end-user will be able to stop editing only with the ENTER and ESC keys. |
| captionLabel | Specifies the caption of the dialog. If not set $.ig.GridUpdating.locale.rowEditDialogCaptionLabel is used. |
This procedure guides you through the process of configuring row edit dialog in the igGrid.
Following is a conceptual overview of the process:
The following steps demonstrate how to configure Row Edit Dialog in the igGrid.
Reference the required JavaScript and CSS files.
The following code snippet is using the Infragistics loader to reference the updating feature of igGrid
In HTML:
 <script src="jquery.min.js" type="text/javascript"></script>
 <script src="jquery-ui.min.js" type="text/javascript"></script>
 <script src="infragistics.loader.js"></script>
 <script type="text/javascript">
     $.ig.loader({
         scriptPath: "http://localhost/ig_ui/js/",
         cssPath: "http://localhost/ig_ui/css/",
         resources: "igGrid.Selection,igGrid.Updating"
     });
 </script>
The following code defines a JavaScript array of objects.
This data is used as the igGrid’s data source.
In JavaScript:
 var namedData = new Array();
 namedData[0] = { "ProductID": 1, "UnitsInStock": 100, "ProductDescription": "Laptop", "UnitPrice": "$1000", "DateCol": "24/7/2012" };
 namedData[1] = { "ProductID": 2, "UnitsInStock": 15, "ProductDescription": "Hamburger" };
 namedData[2] = { "ProductID": 3, "UnitsInStock": 4.356, "ProductDescription": "Beer", "UnitPrice": "$1000" };
 namedData[3] = { "ProductID": 4, "UnitsInStock": null, "ProductDescription": null, "UnitPrice": null };
 namedData[4] = { "ProductID": 5, "UnitsInStock": "65", "ProductDescription": "trainers", "UnitPrice": "$1000", "DateCol": "24/6/2012" };
Define a template element for the Row Edit Dialog Template
The following code defines a template element which is used as a row template for the row edit dialog to specify custom formatting and styling.
In HTML:
<script id="dialogTemplate" type="text/html"></script>
In HTML:
<table id="grid1"></table>
The following code enables the updating feature and editMode is set to be “dialog”.
As container of the row edit dialog is set as “owner” with the containment property. Thus, the row edit dialog is draggable only in the grid area.
Column settings are defined and the “ProductID” column is set to be ReadOnly. As the option showReadonlyEditors is false, the disabled columns won’t be rendered as editors in the dialog window (in this case: ProductID).
The property dialogTemplateSelector points to the of the template defined in Step 3
In JavaScript:
 $.ig.loader(function () {
 $("#grid1").igGrid({
     height: "300px",
     width: "600px",
     columns: [
             { headerText: "Product ID", key: "ProductID", width: "100px", dataType: "number" },
             { headerText: "Units In Stock", key: "UnitsInStock", width: "100px", dataType: "number", format: 'double' },
             { headerText: "Product Description", key: "ProductDescription", width: "150px", dataType: "string" },
             { headerText: "Date Column", key: "DateCol", width: "100px", dataType: "date" },
             { headerText: "Unit Price", key: "UnitPrice", width: "100px", dataType: "integer" }
             ],
     autoGenerateColumns: false,
     dataSource: namedData,
     primaryKey: "ProductID",
     features: [
       {
             name: "Selection",
             mode: "row",
             multipleSelection: true
       },
       {
             name: 'Updating',
             startEditTriggers: 'enter dblclick',
             editMode: 'dialog',
             rowEditDialogOptions:{
                 dialogTemplateSelector: "#dialogTemplate",
                 editorsTemplateSelector: "#editorsTemplate",
                    containment: "owner",
                 showReadonlyEditors: false,

             }

       }]
 });
Handle the rowEditDialogBeforeOpen client side event.
The following code handles the rowEditDialogBeforeOpen client side event. It provides references to the igGridUpdating widget and to the row edit dialog DOM element.
In JavaScript:
  $(document).delegate(".selector", "iggridupdatingroweditdialogbeforeopen", function (evt, ui) {
            var gridUpdating = ui.owner;
            var gridID = ui.owner.element.context.id;
            var dialogWindow = ui.dialogElement;
   });
This procedure guides you through the process of configuring a Row Edit Dialog in the igGrid.
To complete the procedure, you need the following:
Following is a conceptual overview of the process:
The following steps demonstrate how to configure a Row Edit Dialog in igGrid.
Reference the required JavaScript and CSS files
In the Index.cshtml View, add the required JavaScript references and instantiate the Infragistics loader.
The following code snippet uses the Infragistics loader to reference igGrid resources
In HTML:
 <script src="jquery.min.js" type="text/javascript"></script>
 <script src="jquery-ui.min.js" type="text/javascript"></script>
 <script src="infragistics.loader.js"></script>
In ASPX:
 <%= Html.Infragistics().Loader()
         .ScriptPath("http://localhost/ig_ui/js/")
         .CssPath("http://localhost/ig_ui/css/")
         .Render()
     %>
Add an ADO.NET Entity Data Model for the Product table of the AdventureWorks Database.
Defining dialogTemplate and editorTemplate for the Row Edit Dialog.
The following code defines a template for the Row Edit Dialog.You can use it to specify custom formatting and styling.
In HTML:
<script id="dialogTemplate" type="text/html"></script>
<script id="editorsTemplate" type="text/html"></script>
Open the Index.cshtml View and add the code below.
The following code enables the updating feature and EditMode is set to be “Dialog”.
The containment option of the row edit dialog is set to be “owner”. Thus the row edit dialog is draggable only in the grid area.
In the code snippet below, the EditorType of ModifiedDate is specified to be DatePicker and is marked as required. Thus the DatePicker editor will be rendered and a validation error message is shown if no value is entered in the field.
The “ProductID” column is set to be ReadOnly. As the option showReadonlyEditors is false, the disabled column won’t be rendered as editor in the dialog window.
The option DialogTemplateSelector points to the ID of the defined x-jquery-tmpl template above.
In ASPX:
  <%= Html.Infragistics().Grid(Model).ID("grid1")
         .PrimaryKey("ProductID")
         .AutoGenerateColumns(false)
         .AutoGenerateLayouts(false)
         .Virtualization(false)
         .LocalSchemaTransform(true)
         .RenderCheckboxes(true)
         .Columns(column =>
         {
             column.For(x => x.ProductID).HeaderText(“Product ID”).Width("150px");
             column.For(x => x.Name).HeaderText(“Name”).Width("200px");
             column.For(x => x.ModifiedDate).HeaderText(“Modified Date”).Width("200px");
             column.For(x => x.MakeFlag).DataType("bool").HeaderText(“Make Flag”).Width("150px");
             column.For(x => x.ListPrice).HeaderText(“List Price”).Width("150px");
         })
         .Features(features => {
         features.Sorting().Type(OpType.Local);
         features.Paging().PageSize(30).Type(OpType.Local);
         features.Selection().Mode(SelectionMode.Row);
         features.Updating().EnableAddRow(false).EnableDeleteRow(true)
             .EditMode(GridEditMode.Dialog)
             RowEditDialogOptions(opt =>
             {
                 opt.Containment("owner");
                 opt.DialogTemplateSelector("#dialogTemplate");
                 opt.EditorsTemplateSelector("#editorsTemplate");
                 opt.ShowReadonlyEditors(false);
                 opt.Width("300px");
                 opt.Height("400px");
         })
            .ColumnSettings(settings =>
             {
                 settings.ColumnSetting().ColumnKey("ProductID").ReadOnly(true);
                 settings.ColumnSetting().ColumnKey("Name").EditorType(ColumnEditorType.Mask);
                 settings.ColumnSetting().ColumnKey("ModifiedDate").EditorType(ColumnEditorType.DatePicker).EditorOptions("minValue: new Date(1955, 1, 19), maxValue: new Date(), required: true");
                 settings.ColumnSetting().ColumnKey("ListPrice").EditorType(ColumnEditorType.Currency).EditorOptions("button: 'spin', minValue: 0, maxValue: 100000, validatorOptions: {}");
             });
         })
         .DataBind()
         .Height("500px")
         .Width("100%")
         .Render()%>
In the Home controller’s Index action method, extract the Products data from the AdventureWorks database and return it with the view:
In C#:
   public ActionResult Editing()
         {
             var ctx = new AdventureWorksDataContext(this.DataRepository.GetDataContext().Connection);
             var ds = ctx.ProductAllDatas.Take(40);
             return View("RowEditDialog", ds);
         }
Handle the rowEditDialogOpening client side event
The following code handles the rowEditDialoBeforeOpen client side event and provides references to the igGridUpdating widget and to the row edit dialog DOM element.
In JavaScript:
 $("#grid1").live("iggridupdatingroweditdialogbeforeopen ", function (event, ui) {
            var gridUpdating = ui.owner;
            var gridID = ui.owner.element.context.id;
            var dialogWindow = ui.dialogElement;
    });
The following topics provide additional information related to this topic.
The following samples provide additional information related to this topic.
Row Edit Dialog: This sample shows how to configure a Row Edit Dialog in the igGrid
HierarchicalGrid Row Edit Dialog: This sample shows how to configure a Row Edit Dialog in the igHierarchicalGrid
View on GitHub