
This topic explains how to use the Updating feature of the igGrid™ control.
This topic contains the following sections:
The igGrid™ control Updating feature includes three different interactions: updating, adding new rows, and deleting rows. By default all these features are enabled.
The Updating feature can be turned on either for an individual cell (Cell Edit Mode) or an entire row (Row Edit Mode). In Row Edit Mode, all cells in a row allow updating.
The table below briefly explains the user interaction capabilities of the Updating feature.
| The user can… | Using… | Interaction details |
|---|---|---|
| Cancel Updates | Click ‘Cancel’ button, press ESC key | Cancelling updates discards all edits and reverts to the previously committed value. |
| Commit updates | Click ‘Done’ button, press ENTER key | Committing updates replaces the previously committed values in the grid and ends editing mode. |
| Commit updates and edit next cell | press TAB key | Commits updates to the current cell and places the next editable cell into edit mode. The next cell is the one directly to the right in the same row or if committing a value to the last column, the first editable cell in the row below. This interaction is only supported when editMode is set to cell. |
Figure 1: The igGrid control row updating user interface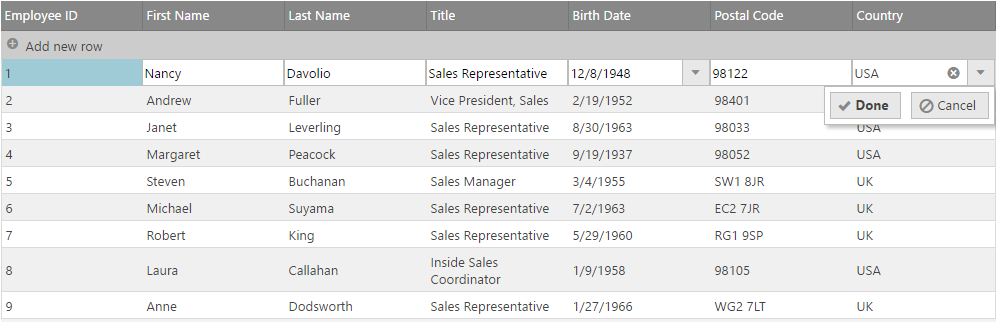
If autoCommit is enabled, the edit row actions trigger updates in the data source. If autoCommit is not enabled, the data source needs to be updated upon operations that rebind the grid such as paging, sorting or filtering. Change detection in the grid is managed through the dataDirty event which allows you to control when to commit data to the data source.
The autoCommit option value also affects aggregateTransactions option functionality. The aggregateTransactions option works on pending transactions (pending transactions are temporary transactions which are not yet committed to the underlying data source), which are available only when autoCommit is set to false.
Note: The grid’s Updating feature is implemented as a jQuery UI widget and therefore follows the standard lifecycle typical for a jQuery UI widget.
Note:
When combo editor is configured in the Updating feature the
igComboscript file (infragistics.ui.combo.js) should also be referenced on the page.When date picker editor is configured in the Updating feature the jQuery UI Datepicker control (and its localization file) should also be referenced on the page.
By enabling the Updating feature, you enable adding, removing or updating the data in the grid.
The igLoader control is the recommended way to load JavaScript and CSS resources required by the Ignite UI for jQuery library controls. First the igLoader script must be included in the page:
In HTML:
<script type="text/javascript" src="ig_ui/js/infragistics.loader.js"></script>
For HTML views the igLoader must be instantiated this way:
In JavaScript:
<script  type="text/javascript">
$.ig.loader({
    scriptPath: "/ig_ui/js/",
    cssPath: "/ig_ui/css/",
    resources: "igGrid.Updating"
});
</script>
In HTML:
<script src="scripts/jquery.min.js" type="text/javascript"></script>
<script src="scripts/ig_ui/js/modules/infragistics.ui.grid.updating.js" type="text/javascript"></script>
<script src="scripts/ig_ui/js/modules/infragistics.ui.grid.shared.js" type="text/javascript"></script>
<script src="scripts/ig_ui/js/modules/infragistics.ui.editors.js" type="text/javascript"></script>
The snippet below demonstrates how to configure the igGrid to support updating.
In Javascript:
$("#grid1").igGrid({
    primaryKey: "ProductID",
    columns: [
        { headerText: "Product ID", key: "ProductID", dataType: "number" },
        { headerText: "Product Name", key: "Name", dataType: "string" },
        { headerText: "ProductNumber", key: "ProductNumber", dataType: "string" }
    ],
    dataSource: “adventureWorks.php”,
    responseDataKey: 'Records',
    features: [
        {
            name : 'Updating'
        }
    ]
});
Note: Updating requires
primaryKeyoption to be set and alsodataTypeproperty for the primary key column, otherwise underlying data source may not work as expected.
In Razor:
<%= Html.Infragistics().Grid(Model)
.ID("grid1")
.PrimaryKey("ProductID")
.UpdateUrl(Url.Action("UpdatingSaveChanges"))
.Columns(column =>
    {
        column.For(x => x.ProductID).HeaderText("Product ID").Width("100px");
        column.For(x => x.Name).HeaderText("Product Name").Width("200px");
        column.For(x => x.ProductNumber).HeaderText("Product Number").Width("200px");
    })
.Features(features => {
        features.Updating();
    })
.Height("500")
.DataSourceUrl(Url.Action("UpdatingGetData"))
.DataBind()
.Render()%>
In Javascript:
$("#grid1").igGrid({
    columns: [
        { headerText: "Product ID", key: "ProductID", dataType: "number" },
        { headerText: "Product Name", key: "Name", dataType: "string" },
        { headerText: "ProductNumber", key: "ProductNumber", dataType: "string" }
    ],
    dataSource: “adventureWorks.php”,
    responseDataKey: 'Records',
    features: [
        {
            name : 'Updating',
            enableAddRow: true,
            enableDeleteRow: true,
            editMode: 'none'
        }
    ]
});
In Razor:
<%=Html.Infragistics().Grid(Model).ID("grid1").PrimaryKey("ProductID").UpdateUrl(Url.Action("UpdatingSaveChanges")).Columns(column =>
    {
        column.For(x => x.ProductID).HeaderText("Product ID").Width("100px");
        column.For(x => x.Name).HeaderText("Product Name").Width("200px");
        column.For(x => x.ProductNumber).HeaderText("Product Number").Width("200px");
    }).Features(features => {
        features.Updating()
            .EnableDeleteRow(true)
            .EnableAddRow(true)
            .EditMode(GridEditMode.None);
    }).Height("500").DataSourceUrl(Url.Action("UpdatingGetData"))
    .DataBind().Render()%>
Each column is configurable with the columnSettings options as listed in the table below.
| Property name (default values in parenthesis) | Description |
|---|---|
| columnKey (null) | Key of the column for which this column setting applies |
| editorProvider | Custom editor provider which should extend $.ig.EditorProvider or $.ig.EditorProviderBase and implement its member methods. |
| editorType (null) | Custom type of igEditor (‘text’, ‘numeric’, ‘datepicker’, ‘combo’,’rating’ etc.) |
| editorOptions (null) | Custom options supported by a specific igEditor or in case of combo and rating, it should provide options available for igCombo or igRating. |
| required (false) | Enables validation for required entry |
| readOnly (false) | Makes cell in column not editable |
| validation (false) | Enables validation for value in igEditor |
| defaultValue (null) | Default value for cell in column for Add-New-Row |
In Javascript:
$("#grid").igGrid({
    features: [
        {
            name: "Updating",
            columnSettings: [
                {
                    columnKey : "Name",
                    defaultValue: "Infragistics",
                    editorType: "text",
                    editorOptions: {
                        buttonType: "dropdown",
                        listItems: names,
                        readOnly: true
                    },
                    required: true,
                    validation: true
                }
            ]
        }
    ]
});
In Javascript:
$("#grid1").igGrid({
    columns: [
        { headerText:"Product ID", key:"ProductID", width: "100px" , dataType:"number" },
        { headerText:"Product Name", key:"Name", width: "180px" , dataType:"string" },
        { headerText:"ProductNumber", key:"ProductNumber", width: "100px", dataType:"string" },
        { headerText:"Color", key:"Color", width: "100px", dataType:"string" },
        { headerText:"SafetyStockLevel", key:"SafetyStockLevel", width: "100px", dataType:"string" },
        { headerText:"ReorderPoint", key:"ReorderPoint", width: "100px", dataType:"number" },
        { headerText:"ListPrice", key:"ListPrice", width: "100px", dataType:"number" },
    ],
    dataSource: adventureWorks,
    features: [
        {
            name: 'Updating',
            columnSettings: [
            {
                columnKey: "ProductID",
                editorOptions: {
                    readOnly: true
                }
            },
            {
                columnKey: "Name",
                editorType: 'string',
                validation: true,
                editorOptions: {
                    required: true
                }
            },
            {
                columnKey: "ProductNumber",
                editorType: 'string',
                validation: true,
                editorOptions: {
                    required: true
                }
             },
            {
                columnKey: "Color",
                editorType: 'string',
                validation: false,
                editorOptions: {
                    required: false
                }
            },
            {
                columnKey: "SafetyStockLevel",
                editorType: 'numeric',
                validation: true,
                editorOptions: {
                    required: true
                }
            },
            {
                columnKey: "ReorderPoint",
                editorType: 'numeric',
                validation: true,
                editorOptions: {
                    required: true
                }
            },
            {
                columnKey: "ListPrice",
                editorType: 'numeric',
                validation: true,
                editorOptions: {
                    button: 'spin',
                    minValue: 0,
                    maxValue: 99,
                    required: true
                }
            },
            {
                columnKey: "StandardCost",
                editorType: 'currency',
                validation: true,
                editorOptions: {
                    button: 'spin',
                    required: true
                }
            }
            ]

        }
    ]
});
In Razor:
<%= Html.Infragistics().Grid(Model).ID("grid1").PrimaryKey("ProductID").UpdateUrl(Url.Action("UpdatingSaveChanges")).Columns(column =>
    {
        column.For(x => x.ProductID).HeaderText("Product ID").Width("100px");
        column.For(x => x.Name).HeaderText("Product Name").Width("200px");
        column.For(x => x.ModifiedDate).HeaderText("Modified Date").Width("200px");
        column.For(x => x.ListPrice).HeaderText("List Price").Width("200px");
    }).Features(features => {
        features.Updating()
            .ColumnSettings(settings =>
             {
                 settings.ColumnSetting().ColumnKey("ProductID").ReadOnly();
                 settings.ColumnSetting().ColumnKey("Name").EditorType(ColumnEditorType.Text).Required().Validation();
                 settings.ColumnSetting().ColumnKey("ModifiedDate").EditorType(ColumnEditorType.DatePicker);
                 settings.ColumnSetting().ColumnKey("ListPrice").EditorType(ColumnEditorType.Currency);
             });
    }).Height("500").DataSourceUrl(Url.Action("UpdatingGetData"))
    .DataBind().Render()%>
To install the Ignite UI CLI:
npm install -g igniteui-cli
Once the Ignite UI CLI is installed the commands for generating an Ignite UI for jQuery project, adding a new igGrid component with Updating feature configured, building and serving the project are as following:
ig new <project name> --framework=jquery
cd <project name>
ig add grid-editing newGridEditing
ig start
For more information and the list of all available commands read the Using Ignite UI CLI topic.
When you initialize a new row on the grid for a data source that includes a primary key, the generatePrimaryKeyValue event of igGrid Updating feature is raised to provide a primary key value to the new row. The second parameter of the event handler includes the value member which is used to return the new primary key value back up to the grid. By default, the value is initialized with a value that is equal to the number of rows in the data source. The following code listing is an example of how to implement generating a new primary key value to a new row of the grid.
In Javascript:
function getTempKey(){
    var key;
    //This function gets the appropriate temporary key for a new row from the server
    return key;
}

$("#grid1").igGrid({
    columns: [
      { headerText:"Product ID", key:"ProductID", width: "100px" , dataType:"number" },
      { headerText:"Product Name", key:"Name", width: "180px" , dataType:"string" }
    ],
    dataSource: adventureWorks,
    primaryKey: 'ProductID',
    features: [
        {
            name: 'Updating',
            generatePrimaryKeyValue: function (evt, ui) {
                // setting a temporary key for the new row
                ui.value = getTempKey();
            },
            columnSettings: [
                {
                    columnKey: "ProductID",
                    editorOptions: {
                        readOnly: true
                    }
                }
            ]
        }
    ]
});
When save changes to the data in the grid to the server, the saveChanges is called to send persistence messages to the server. The saveChanges method invokes an AJAX request posting to the updateUrl option (if specified) to the server. During the post, the grid passes the serialized transaction log as a JSON string as part of the POST.
Adding batch updates to an instantiated grid requires that you use the live method instead of bind in order to add batch updates to an existing grid.
In JavaScript:
<script type="text/javascript">  $("#saveChanges").bind({
            click: function (e) {
                $("#grid1").igGrid("saveChanges");
            }
        });
</script>
In Razor:
    <%= Html.Infragistics().Grid(Model).ID("grid1").PrimaryKey("ProductID").UpdateUrl(Url.Action("UpdatingSaveChanges")).Columns(column =>
    {
        column.For(x => x.ProductID).HeaderText("Product ID").Width("100px");
        column.For(x => x.Name).HeaderText("Product Name").Width("200px");
        column.For(x => x.ModifiedDate).HeaderText("Modified Date").Width("200px");
        column.For(x => x.ListPrice).HeaderText("List Price").Width("200px");
    }).Features(features => {
        features.Updating()
            .ColumnSettings(settings =>
                 {
                     settings.ColumnSetting().ColumnKey("ProductID").ReadOnly();
                     settings.ColumnSetting().ColumnKey("Name").EditorType(ColumnEditorType.Text).Required().Validation();
                     settings.ColumnSetting().ColumnKey("ModifiedDate").EditorType(ColumnEditorType.DatePicker);
                     settings.ColumnSetting().ColumnKey("ListPrice").EditorType(ColumnEditorType.Currency);
                 });
    }).Height("500").DataSourceUrl(Url.Action("UpdatingGetData"))
    .DataBind().Render()%>
<input type="button" id="saveChanges" value="Save Changes" />
The action methods implemented below demonstrate how to accept an Ajax post to persist data changes from the grid. Grid transactions are available in the form field labeled ig_transactions for processing against your data layer. They are processed differently depending on the edit mode (row or cell).
Use the GridModel.LoadTransactions method to convert the post data to Transaction objects. Row data is saved in Transaction.row field.
In C#:
public ActionResult UpdatingSaveChanges()
{
    var ctx = new AdventureWorksDataContext();
    var ds = ctx.MyComplexProducts;
    ViewData["GenerateCompactJSONResponse"] = false;
    GridModel m = new GridModel();
    List<Transaction<MyComplexProduct>> transactions = m.LoadTransactions<MyComplexProduct>(HttpContext.Request.Form["ig_transactions"]);

    foreach (Transaction<MyComplexProduct> t in transactions)
    {
        var product = (from p in ctx.MyComplexProducts where p.ProductID == Int32.Parse(t.rowId) select p).Single();
        if(t.row.Name != null)
        {
            product.Name = t.row.Name;
        }
        if (t.row.ListPrice != null)
        {
            product.ListPrice = t.row.ListPrice;
        }
        if (t.row.ModifiedDate != null)
        {

            product.ModifiedDate = t.row.ModifiedDate;
        }
    }

    JsonResult result = new JsonResult();
    Dictionary<string, bool> response = new Dictionary<string, bool>();
    response.Add("Success", true);
    result.Data = response;
    return result;
}
Use the GridModel.LoadTransactions method to convert the post data to Transaction objects. Cell data is saved in the Transaction object itself. Use Transaction.col field to retrieve the column which is updated. Use Transaction.rowId to retrive the primary key value. Use Transaction.value to retrieve the new cell value.
Note: The cell values of DateTime fields should be parsed using the GridModel.JsonStringToDateTime method, because they are serialized using Microsoft format for serializing dates (Example: /Date(1356991200000)/).
In C#
public ActionResult UpdatingSaveChanges()
{
    var ctx = new AdventureWorksDataContext();
    var ds = ctx.MyComplexProducts;
    ViewData["GenerateCompactJSONResponse"] = false;
    GridModel m = new GridModel();
    List<Transaction<MyComplexProduct>> transactions = m.LoadTransactions<MyComplexProduct>(HttpContext.Request.Form["ig_transactions"]);

    foreach (Transaction<MyComplexProduct> t in transactions)
    {
        var product = (from p in ctx.MyComplexProducts where p.ProductID == Int32.Parse(t.rowId) select p).Single();
        switch(t.col)
        {
            case "Name":
                product.Name = t.value;
                break;
            case "ListPrice":
                product.ListPrice = t.value;
                break;
            case "ModifiedDate":
                product.ModifiedDate = GridModel.JsonStringToDateTime(t.value);
                break;
        }
    }

    JsonResult result = new JsonResult();
    Dictionary<string, bool> response = new Dictionary<string, bool>();
    response.Add("Success", true);
    result.Data = response;
    return result;
}
If autoCommit is not enabled (batch mode), the data source needs to be updated upon operations that rebind the grid such as paging, sorting or filtering. Change detection in the grid is managed through the dataDirty event which allows you to control when to commit data to the data source.
If there are pending changes when one of these operations executes and the dataDirty event is not handled properly, an exception is thrown notifying you that you must handle the dataDirty event. The dataDirty event must be cancelled by returning false in order to avoid the exception. You can commit any unsaved changes to the grid by calling the igGrid’s commit method prior to cancelling the event. After cancelling this event, data binding executes regardless of whether the transactions are committed or not and any transactions not committed are discarded.
In Javascript:
$("#grid1").live("iggridupdatingdatadirty", function (event, ui) {
    $("#grid1").igGrid("commit");
    return false;
});
The updating UI encompasses the built-in adding, updating, and deleting functionality of the grid including the add new button, add new row, editors, and edit and delete buttons.
The startEdit method is used to put the grid into edit mode. The startEdit method requires the row index as the first parameter and column index as the second parameter. These indexes correspond to the row and column identifying the location of a cell to be placed into edit mode when the startEdit method is called.
In Javascript:
$('#grid1').igGridUpdating('startEdit', 1, 1);
The *-en.js files contain localized strings for various parts of the user interface (UI). To localize the feature in a different language, replace the updating file ending with “-en.js” with your localized version. You only need to change the values in the file; the keys must remain the same.
In addition to the updating UI, there is a rich API for adding, updating, and deleting rows programmatically.
When adding a row programmatically, a primary key value is not required. If you do not specify a primary key, a value is provided for you based off of the number of rows in the grid. This can later be processed on the server and replaced with a valid primary key as required by your persistence medium.
In Javascript:
$('#grid1').igGridUpdating('addRow', { 'Code': 'ABC', 'Name': 'Alex' });
When deleting a row programmatically, a primary key value is required. You can pass as an optional parameter the reference to the TR element which represents the row
In Javascript:
$('#grid1').igGridUpdating('deleteRow', "AFG");
$('#grid1').igGridUpdating('deleteRow', 1, $('#grid1').igGrid("rowAt", 0));
In Javascript:
$('#grid1').igGridUpdating('updateRow', 1, { 'FirstName': 'Alex' });
The sample below demonstrates the Updating API and events.
You can handle client-side events to the Updating feature in two ways, both of which are described below.
Binding to client-side events from anywhere in the application
In Javascript:
$("#grid1").bind("iggridupdatingeditcellstarted", handler);
Binding to client-side events by specifying the event name as an option during initialization.
Also, all events with the -ing suffix are cancelable and the action can be terminated when in the handler is set to return false.
In Javascript:
$("#grid1").igGrid({
    columns: [
        { headerText: "Product ID", key: "ProductID", dataType: "number" },
        { headerText: "Product Name", key: "Name", dataType: "string" },
        { headerText: "Product Number", key: "ProductNumber", dataType: "string" },
    ],
    width: '500px',
    dataSource: products,
    features: [
        {
            name: 'Updating',
            editCellStarted: onEdCellStarted
        }
    ]
});

function onEditCellStarted(event, args) {
 // Implement logic to handle the cell started event

}
The Updating feature is configured through igGrid control’s features array during instantiation. When calling the updating API at runtime, the igGridUpdating API is called directly.
The igGridUpdating widget supports setting options after initialization by setting the option value. Please see the igGridUpdating API Documentation for more details.
In Javascript:
$('#grid1').igGridUpdating('option', 'editMode', 'cell');
Note: The current section describes the keyboard interactions with the default property settings. The related options that may change these behaviors are:
- horizontalMoveOnEnter - Default: false
- startEditTriggers - Default: click,F2,enter
- excelNavigationMode - Default: false
When a cell/row is selected (Selection feature is enabled):
When editMode is row and a row is in edit mode, the following key interactions are available:
When editMode is cell and a cell is in edit mode, the following key interactions are available:
When editMode is rowEditTemplate and a cell is in edit mode, the following key interactions are available: When the row edit template dialog is open:
When in edit mode and there is multiline text editor, the following key interaction is available:
When the adding row is in edit mode:
When a row is selected (the Selection feature is enabled and its mode is row):
Following are some other topics you may find useful.
Following are some samples you may find useful.
View on GitHub