
This topic explains, in both conceptual and step-by-step form, how to add the igPivotGrid™ control to an ASP.NET MVC application.
The following topics are prerequisites to understanding this topic:
igPivotGrid Overview: This topic provides conceptual information about the igPivotGrid control including its main features, minimum requirements, and user functionality.
Adding igPivotGrid to an HTML Page: This topic explains, in both conceptual and step-by-step form, how to add the igPivotGrid control to an HTML page. This topic provides the complete listing of the required JavaScript resource files.
This topic contains the following sections:
The igPivotGrid is a client-side component accompanied by an Ignite UI for MVC implementation that allows the component to be used in the CS/VB code of an MVC View. It allows also consuming data from the View’s Model (using igOlapFlatDataSource™). When using the Ignite UI for MVC igPivotGrid, there are two ways to bind it to data:
This is done by setting the required DataSourceOptions (used to create a data source object). This approach is explained in this topic.
This is done by providing the ID of a pre-configured data source instance (DataSourceID) (as explained in Adding igOlapXmlaDataSource to an ASP.NET MVC Application and Adding igOlapFlatDataSource to an ASP.NET MVC Application).
Defining the igPivotGrid in the View is achieved by setting the required properties using methods that always return the same object that called them. This allows for chaining syntax to be used for setting all required properties. For complex objects such as DataSourceOptions, lambda expression builders are used in order to achieve this kind of syntax.
Following are the general requirements for adding igPivotGrid to an ASP.NET MVC application:
Following are the general conceptual steps for adding igPivotGrid to an ASP.NET MVC application.
Adding a reference to the Infragistics namespace
Adding a reference to the required JavaScript resources
Adding the igPivotGrid and configuring the data source
The procedure below demonstrates how to add the igPivotGrid control to an ASP.NET MVC application. Code examples for both approaches for adding igPivotGrid – by setting the DataSourceOptions and by setting the DataSourceID, are available. The required resources in this example are referred to automatically with the Infragistics Loader.
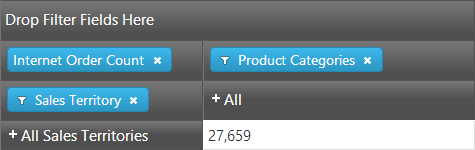
The following screenshot is a preview of the final result.
To complete the procedure, you need the following:
Infragistics.Web.Mvc.dll assembly added to the application projectNote: If you want to use the remote xmla data provider (XmlaDataSourceAction) MVC 3 or higher is required.
The following steps demonstrate how to add an igPivotGrid to an ASP.NET MVC application.
Add a reference to the Infragistics namespace.
Add the Infragistics.Web.Mvc namespace to your View code.
In ASPX:
<%=Import Namespace=”Infragistics.Web.Mvc” %>
Add a reference to the required JavaScript resources.
Add script reference to the igLoader.
Add the following script reference to the head section of the View.
In ASPX:
<script src="[path to js folder]/infragistics.loader.js"></script>
Add the igLoader definition.
The following code loads the required resources using the Infragistics Loader.
In ASPX:
 <%=Html.Infragistics()
         .Loader()
         .ScriptPath("[js path]")
         .CssPath("[css path]")
         .Render()
 %>
Add the igPivotGrid and configure the data source.
The following code adds an igPivotGrid bound to an igOlapXmlaDataSource™:
In ASPX:
 <%= Html.Infragistics().PivotGrid()
 .DataSourceOptions(
     dataSourceOptions => dataSourceOptions
         .Columns("[Product].[Product Categories]")
         .Rows("[Sales Territory].[Sales Territory]")
         .Measures("[Measures].[Internet Order Count]")
         .XmlaOptions(
         xmlaOptions => xmlaOptions
             .ServerUrl("http://sampledata.infragistics.com/olap/msmdpump.dll")
             .Catalog("Adventure Works DW Standard Edition")
             .Cube("Adventure Works")
             .MeasureGroup("Internet Sales"))).Render()
 %>
If you prefer to use an already preconfigured data source you need to set the DataSourceID property . The code example below assumes that an igOlapXmlaDataSource or igOlapFlatDataSource with ID of “olapDataSource” is present in the view. (For details, refer to Adding igOlapXmlaDataSource to an ASP.NET MVC Application and Adding igOlapFlatDataSource to an ASP.NET MVC Application).
In ASPX:
 <%= Html.Infragistics().PivotGrid()
 .DataSourceID(“olapDataSource”)
 .Render()
 %>
The following topics provide additional information related to this topic.
Adding igOlapFlatDataSource to an ASP.NET MVC Application: This topic explains, in both conceptual and step-by-step form, how to add the igOlapFlatDataSource control to an ASP.NET MVC application.
Adding igOlapXmlaDataSource to an ASP.NET MVC Application: This topic explains, in both conceptual and step-by-step form, how to add the igOlapXmlaDataSource control to an ASP.NET MVC application.
igPivotDataSelector Overview: This topic provides conceptual information about the igPivotDataSelector™ control including its main features, minimum requirements, and user functionality.
igPivotView Overview: This topic provides conceptual information about the igPivotView™ control including its main features, minimum requirements, and user functionality.
The following samples provide additional information related to this topic.
Using the Ignite UI for MVC with Xmla Data Source: This sample demonstrates using the Ignite UI for MVC igOlapXmlaDataSource control and how to use it as data source in the igPivotDataSelector and igPivotGrid controls.
Using the Ignite UI for MVC with Flat Data Source: This sample demonstrates using the Ignite UI for MVC igOlapFlatDataSource control and how to use it as data source in the igPivotDataSelector and igPivotGrid controls.
View on GitHub