
This topic explains, with code examples, how to configure custom drop validation of the Drag-and-Drop feature of the igTree™ control, in both JavaScript and MVC.
The following topics are prerequisites to understanding this topic:
Drag-and-Drop Overview (igTree): This topic provides an overview the Drag-and-Drop feature of the igTree control.
Enabling Drag-and-Drop (igTree): This topic explains, with code examples, how to enable the Drag-and-Drop feature in the igTree control.
This topic contains the following sections:
By default, the Drag-and-Drop feature of igTree control has own build validation. It validates whether the drop target is a node. You can implement additional validation by using the customDropValidation property.
The following table shows the property settings implementing custom drop validation.
| In order to: | Use this property: | And set it to: |
|---|---|---|
| Configure custom drop validation | customDropValidation |
your custom function |
The following table demonstrates examples of setting the customDropValidation property in both jQuery and MVC:
| Technology | customDropValidation property value |
|---|---|
| JavaScript | function |
| MVC | string |
The following table lists the code examples included in this topic.
| Example | Description |
|---|---|
| Code Example: Configuring Drag-and-Drop Custom Drop Validation in JavaScript | This procedure initializes igTree with Drag-and-Drop feature, adds custom drop validation, and binds it to a JSON data source with simple folder structure. |
| Code Example: Configuring Drag-and-Drop Custom Drop Validation in MVC | This procedure initializes igTree with Drag-and-Drop feature, adds custom drop validation and binds it to a XML file with simple folder structure. |
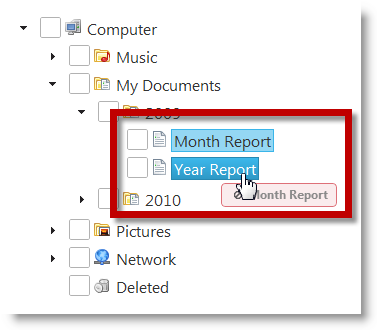
This procedure initializes igTree with Drag-and-Drop feature, adds custom drop validation, and binds it to a JSON data source with simple folder structure. The custom drop validation function checks whether the dragging node is a file (or folder) and whether it is being dropped over a file node. If the drop validation fails the dragging of the node is reverted.
The following screenshot demonstrates the custom validation performed on a user drop action.
This topic takes you step-by-step toward configuring igTree with Drag-and-Drop feature with custom drop validation in JavaScript. The following is a conceptual overview of the process:
Defining the data source for the igTree control
Adding the script references using the Infragistics Loader
Configuring the Drag-and-Drop mode to Copy
Adding the Custom Drop Validation function
The following steps demonstrate how to configure igTree with Drag-and-drop custom drop validation in JavaScript.
Define the data source for the igTree control.
For the sake of this example, a simple folder and file structure is created in JSON format. Each object has the following properies
Text – the name of the nodeValue – the type of node - file or folderImageUrl – URL link which points to a specific node imageFolder – array of objects with same data as above
In JavaScript:
[{
  Text: "My Documents",
  Value: "Folder",
  ImageUrl: "../content/images/DocumentsFolder.png",
  Folder: [{
        Text: "2009",
        Value: "Folder",
        ImageUrl: "../content/images/DocumentsFolder.png",
        Folder: [{
              Text: "Month Report",
              Value: "File",
              ImageUrl: "../content/images/Documents.png",
              Folder: ""
        }, {
              Text: "Year Report",
              Value: "File",
              ImageUrl: "../content/images/Documents.png",
              Folder: ""
        }]
  }, {
        Text: "2010",
        Value: "Folder",
        ImageUrl: "../content/images/DocumentsFolder.png",
        Folder: [{
              Text: "Month Report",
              Value: "File",
              ImageUrl: "../content/images/Documents.png",
              Folder: ""
        }, {
              Text: "Year Report",
              Value: "File",
              ImageUrl: "../content/images/Documents.png",
              Folder: ""
        }]
  }]
}]
Add the script references using the Infragistics loader.
The references are required for initializing the igTree control.
Create an HTML file (e.g. tree.html) with the following references to in it.
In HTML:
 <script src="../scripts/jquery.min.js"></script>
 <script src="../scripts/jquery-ui.min.js"></script>
 <script src="../js/infragistics.loader.js"></script>
  $.ig.loader({
     scriptPath: "../js/",
     cssPath: "../css/",
     resources: "igTree"
 });
Add the Custom Drop Validation function.
Define the DOM (Document Object Model) Html element placeholder in the tree.html file.
In HTML:
 <!--igTree target element-->
 <div id="tree">
 </div>
Instantiate an igTree with the Custom Drop Validation function in JavaScript.
In JavaScript:
 $("#tree").igTree({
     checkboxMode: 'triState',
     singleBranchExpand: true,
     dataSource: data,
     dataSourceType: 'json',
     initialExpandDepth: 0,
     pathSeparator: '.',
     bindings: {
         textKey: 'Text',
         valueKey: 'Value',
         imageUrlKey: 'ImageUrl',
         childDataProperty: 'Folder'
     },
     dragAndDrop: true,
     dragAndDropSettings: {
         customDropValidation: function (element) {
             // Validates the drop target
             var valid = true,
             droppableNode = $(this);
             if (droppableNode.is('a') && droppableNode.closest('li[data-role=node]').attr('data-value') === 'File') {
                 valid = false;
             }
             return valid;
         }
     }
 });
This procedure initializes igTree with Drag-and-Drop feature, adds custom drop validation, and binds it to a XML file with simple folder structure. The custom drop validation function checks whether the dragging node is a file (or folder) and whether it is being dropped over a file node. If the drop validation fails the dragging of the node is reverted.
The following screenshot demonstrates the custom validation performed on a user drop action.
To complete the procedure, you need the following:
Infragistics.Web.Mvc.dll addedThis topic takes you step-by-step toward configuring igTree with Drag-and-Drop feature with custom drop validation in MVC. The following is a conceptual overview of the process:
Creating an XML data source file
Defining the View
Defining the Controller
The following steps demonstrate how to define View and Controller for configuring igTree.
Create an XML data source file.
ThreeData.xml.Add sample data to the XML file with Text, ImageUrl and Value following attributes following this structure:
In XML:
 …
 <Folder Text="Network" ImageUrl="../content/images/igTree/Common/door.png" Value="Folder">
           <Folder Text="Archive" ImageUrl="../content/images/igTree/Common/door_in.png" Value="Folder"></Folder>
           <Folder Text="Back Up" ImageUrl="../content/images/igTree/Common/door_in.png" Value="Folder"></Folder>
           <Folder Text="FTP" ImageUrl="../content/images/igTree/Common/door_in.png" Value="Folder"></Folder>
 </Folder>
 …
Define the View.
Add a new View to the Views folder. For this example, name it SampleDataXML.cshtml.
In the View, define the tree and set the name of the function performing the custom drop validation. Following is a sample code to add to the view.
In C#:
 <script src="http://localhost/ig_ui/js/infragistics.loader.js" type="text/javascript"></script>
     @(Html
         .Infragistics()
         .Loader()
         .ScriptPath("http://localhost/ig_ui/js/")
         .CssPath("http://localhost/ig_ui/css/")
         .Render()
     )
     @(Html
         .Infragistics()
         .Tree()
         .ID("XMLTree")
         .Bindings( bindings => {
         .bindings
         .ValueKey("Value")
         .TextKey("Text")
         .ImageUrlKey("ImageUrl")
         .ChildDataProperty("Folder");
         })
         .InitialExpandDepth(0)
         .DataSource(Model)
         .CheckboxMode(CheckboxMode.TriState)
         .SingleBranchExpand(true)
         .DragAndDrop(true)
         .DragAndDropSettings(settings =>
         {
         // Configuring Drag-and-drop with custom drop validation
         settings.CustomDropValidation ("customDropValidation");
         })
         .DataBind()
         .Render()
     )
Define the customDropValidation function in JavaScript. The function validates that the target drop location is not a file.
In JavaScript:
 customDropValidation (element) {
 // Validates the drop target
 var valid = true,
 droppableNode = $(this);
 if (droppableNode.is('a') && droppableNode.closest('li[data-role=node]').attr('data-value') === 'File') {
     valid = false;
 }
     return valid;
 }
Define the Controller.
Add a new Controller to the Controllers folder. For this example, name it name it SampleDataXMLController.cs.
Add the method for returning the View (ActionResult method). For this example, name it DataBindingUsingMVC.
To the controller, add a new method to load the XML file and return the IEnumerable objects of the Folders objects. For this example, name it GetData.
Add a class representing the Folders objects. (Folders in this example).
In C#:
 public class SampleDataXMLController : Controller
     {
         public ActionResult DataBindingUsingMVC()
         {
             return View("SampleDataXML", this.GetData());
         }
         private IEnumerable<Folders> GetData()
         {
             string phisicalFilePath = System.Web.HttpContext.Current.Server.MapPath("~/ThreeData.xml");
             var ctx = XDocument.Load(phisicalFilePath);
             IEnumerable<Folders> data = from item in ctx.Root.Elements("Folder")
                                         select new Folders
                                         {
                                             Text = item.Attribute("Text").Value,
                                             Value = item.Attribute("Value").Value,
                                             ImageUrl = Url.Content(item.Attribute("ImageUrl").Value),
                                             Folder = from i1 in item.Elements("Folder")
                                                      select new Folders
                                                      {
                                                          Text = i1.Attribute("Text").Value,
                                                          Value = i1.Attribute("Value").Value,
                                                          ImageUrl = Url.Content(i1.Attribute("ImageUrl").Value),
                                                          Folder = from i2 in i1.Elements("Folder")
                                                                   select new Folders
                                                                   {
                                                                       Text = i2.Attribute("Text").Value,
                                                                       Value = i2.Attribute("Value").Value,
                                                                       ImageUrl = Url.Content(i2.Attribute("ImageUrl").Value),
                                                                       Folder = from i3 in i2.Elements("Folder")
                                                                                select new Folders
                                                                                {
                                                                                    Text = i3.Attribute("Text").Value,
                                                                                    Value = i3.Attribute("Value").Value,
                                                                                    ImageUrl = Url.Content(i3.Attribute("ImageUrl").Value)
                                                                                }
                                                                   }
                                                      }
                                         };
             return data;
         }
     }
     public class Folders {
         public string Text { get; set; }
         public string Value { get; set; }
         public string ImageUrl { get; set; }
         public IEnumerable<Folders> Folder { get; set; }
 }
The following topics provide additional information related to this topic.
Configuring the Drag-and-Drop Mode (igTree): This topic explains, with code examples, how to configure the Drag-and-Drop mode of the igTree control, in both JavaScript and MVC.
Configuring the Look of the Drag Visual Tokens (igTree): This topic explains, with code examples, how to configure the look of the drag visual tokens the igTree control, in both JavaScript and MVC.
Drag-and-Drop API Reference (igTree): The topics in this group provide reference information about the events and properties of the igTree control that are related to the Drag-and-Drop feature.
The following samples provide additional information related to this topic.
Drag and Drop - Single Tree: This sample demonstrates how to initialize the igTree control with the Drag-and-Drop feature enabled.
Drag and Drop - Multiple Trees: This sample demonstrates how to drag-and-drop nodes between two igTrees.
API and Events: This sample demonstrates how to use igTree API.
View on GitHub