
This topic explains, with code examples, how to configure the look of the drag visual tokens of the igTree™ control, in both JavaScript and MVC.
The following topics are prerequisites to understanding this topic:
Drag-and-Drop Overview (igTree): This topic provides an overview the Drag-and-Drop feature of the igTree control.
Enabling Drag-and-Drop (igTree): This topic explains, with code examples, how to enable the Drag-and-Drop feature in the igTree control.
This topic contains the following sections:
A visual token is a hint text that appears under the mouse pointer when the user drags a node. It indicates the current state of the dragging action, like whether a node is about to be moved, copied or dropped onto an invalid area. You can customize the way the visual tokens look through the HTML markup.
The following illustration compares side-by-side the looks of default (left) and a custom (right) visual token looks. In the picture on the right, the custom visual token look is customized with a div structure and a CSS style.
There are several tokens that can be configured for the drag action. The tokens are defined by a combination of the following factors:
For example, there is one visual token for copying the node before another node, another one for copying after another node, two other for moving the node before and after another node and so on. Each of these combinations is managed individually by a specific markup property.
For all possible combinations and the properties that manage them, see the Configuration summary chart.
The following table maps the individual Drag-and-Drop visual tokens to the respective properties that configure them in the HTML markup.
| Action | Location | In order to change the visual token when: | Use the this property: |
|---|---|---|---|
| copy | after | The node is being copied after another node | copyAfterMarkup |
| copy | before | The node is being copied before another node. | copyBeforeMarkup |
| copy | between | The node is being copied between other nodes. | copyBetweenMarkup |
| copy | onto | The node is being copied onto another node. | copyToMarkup |
| move | after | The node is being moved after another node. | moveAfterMarkup |
| move | before | The node is being moved before another node. | moveBeforeMarkup |
| move | between | The node is being moved between another nodes. | moveBetweenMarkup |
| move | onto | The node is being moved onto another node. | moveToMarkup |
| copy /move | invalid | The node is being moved onto an invalid area. | invalidMoveToMarkup |
This example demonstrates how to configure the following visual token:
to:
| Technology | Use the this property: | And set it to: |
|---|---|---|
| JavaScript | copyAfterMarkup | copyAfterMarkup: "<div class="message"><h3>Copy After</h3><p> {0}</p></div>" |
| MVC | CopyAfterMarkup | CopyAfterMarkup("<div class="message"><h3>Copy After</h3><p> {0}</p></div>"); |
The following table lists the code examples included in this topic.
| Example | Description |
|---|---|
| Code Example: Configuring drag visual tokens look in JavaScript | This procedure initializes igTree with Drag-and-Drop feature and change drag visual tokens look and binds it to a JSON data. |
| Code Example: Configuring Drag-and-Drop Markup in MVC | This procedure initializes igTree with Drag-and-Drop feature and drag visual tokens look and binds it to a XML file. |
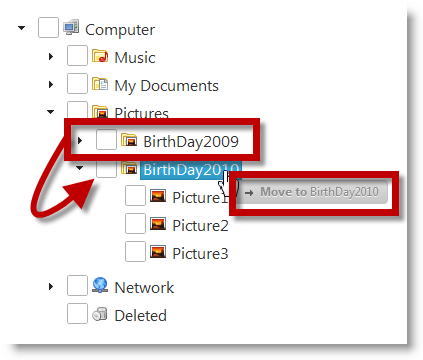
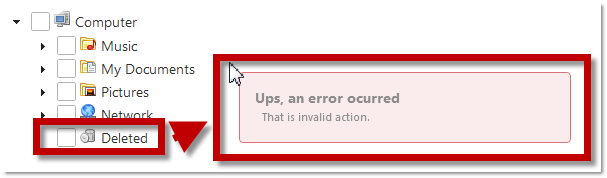
This procedure changes the look of the drag visual tokens to the following to make it larger than the default token and to display a text part of which is formatted as a heading. This is achieved by:
The following screenshot is a preview of the final result.
To complete the procedure, you need an HTML file with an instance of the igTree control bound to a data source. You can use the code from the topics in the Walkthroughs section.
The following is a conceptual overview of the process:
Configuring the Drag-and-Drop visual tokens’ properties
Adding a custom CSS
The following steps demonstrate how to configure an igTree with the Drag-and-Drop feature enabled and the look of the drag visual tokens look in JavaScript.
Configure the Drag-and-Drop visual tokens’ properties.
Define the DOM (Document Object Model) HTML element placeholder in the file in which the igTree control initializes.
In HTML:
 <!--igTree target element-->
 <div id="tree">
 </div>
Instantiate an igTree with the Drag-and-Drop feature and set the drag visual tokens in JavaScript.
In JavaScript:
 <script>
 $.ig.loader(function () {
 $("#tree").igTree({
     checkboxMode: 'triState',
     singleBranchExpand: true,
     dataSource: data,
     dataSourceType: 'json',
     initialExpandDepth: 0,
     pathSeparator: '.',
     bindings: {
         textKey: 'Text',
         valueKey: 'Value',
         imageUrlKey: 'ImageUrl',
         childDataProperty: 'Folder'
     },
     dragAndDrop: true,
     dragAndDropSettings: {
         invalidMoveToMarkup: "<div class="message"><h3>Ups, an error ocurred</h3><p> That is invalid action.</p></div>",
         moveToMarkup: "<div class="message"><h3>Move to</h3><p> {0}</p></div>",
         moveBetweenMarkup: "<div class="message"><h3>Move Between</h3><p> {0} and {1}</p></div>"
         moveAfterMarkup: "<div class="message"><h3>Move After</h3><p> {0}</p></div>",
         moveBeforeMarkup: "<div class="message"><h3>Move Before</h3><p> {0}</p></div>",
         copyToMarkup: "<div class="message"><h3>Copy to</h3><p> {0}</p></div>",
         copyBetweenMarkup: "<div class="message"><h3>Copy Between</h3><p> {0} and {1}</p></div>",
         copyAfterMarkup: "<div class="message"><h3>Copy After</h3><p> {0}</p></div>",
         copyBeforeMarkup: "<div class="message"><h3>Copy Before</h3><p> {0}</p></div>"
         }
     });
 });
 </script>
Add a custom CSS.
In a CSS, configure the CSS properties for the following:
Insert the configured CSS into the HTML file.To achieve the look in the Preview, use the following CSS code.
In CSS:
 <style>
 .message
 {
 width: 300px;
 padding: 15px;
 position: fixed;
 }
 .message h3
 {
 font-size: 14px;
 font-weight: bold;
 }
 </style>
This procedure changes the look of the drag visual tokens to the following to make it larger than the default token and to display a text part of which is formatted as a heading. This is achieved by:
The following screenshot is a preview of the final result.
To complete the procedure, you need the following:
Infragistics.Web.Mvc.dll added to the bin folder or the Global Assembly Cache (GAC).igTree control bound to a data source. You can use the code from the topics in the Walkthroughs section.The following is a conceptual overview of the process:
Configuring the Drag-and-Drop visual tokens’ properties
Adding a custom CSS
The following steps demonstrate how to configure an igTree with the Drag-and-Drop feature enabled and the look of the drag visual tokens look in MVC.
Configure the Drag-and-Drop visual tokens’ properties .
In the View, instantiate an igTree with the Drag-and-Drop feature and set the drag visual tokens. The defined igTree will get the data from the model.
In C#:
 Purpose
 <script src="http://localhost/ig_ui/js/infragistics.loader.js" type="text/javascript"></script>
 @(Html.Infragistics()
     .Loader()
     .ScriptPath("http://localhost/ig_ui/js/")
     .CssPath("http://localhost/ig_ui/css/")
     .Render()
 )
 @(Html.
     Infragistics().
     Tree().
     ID("XMLTree").
     Bindings( bindings => {
         bindings.
         ValueKey("Value").
         TextKey("Text").
         ImageUrlKey("ImageUrl").
         ChildDataProperty("Folder");
     }).
     InitialExpandDepth(0).
     DataSource(Model).
     CheckboxMode(CheckboxMode.TriState).
     SingleBranchExpand(true).
     DragAndDrop(true).
     DragAndDropSettings(settings =>
     {
         // Configuring Drag-and-drop visual tokens
         settings.InvalidMoveToMarkup("<div class="message"><h3>Ups, an error ocurred</h3><p> That is invalid action.</p></div>").
         MoveToMarkup("<div class="message"><h3>Move to</h3><p> {0}</p></div>").
         MoveBetweenMarkup("<div class="message"><h3>Move Between</h3><p> {0} and {1}</p></div>").
         MoveAfterMarkup("<div class="message"><h3>Move After</h3><p> {0}</p></div>").
         MoveBeforeMarkup("<div class="message"><h3>Move Before</h3><p> {0}</p></div>").
         CopyToMarkup("<div class="message"><h3>Copy to</h3><p> {0}</p></div>").
         CopyBetweenMarkup("<div class="message"><h3>Copy Between</h3><p> {0} and {1}</p></div>").
         CopyAfterMarkup("<div class="message"><h3>Copy After</h3><p> {0}</p></div>").
         CopyBeforeMarkup("<div class="message"><h3>Copy Before</h3><p> {0}</p></div>");
     }).
     DataBind().
 Render()
 )
Add a custom CSS.
In a CSS, configure the CSS properties for the following:
Insert the configured CSS into the HTML file.To achieve the look in the Preview, use the following CSS code.
In CSS:
 <style>
 .message
 {
     width: 300px;
     padding: 15px;
     position: fixed;
 }
 .message h3
 {
     font-size: 14px;
     font-weight: bold;
 }
 </style>
The following topics provide additional information related to this topic.
Configuring the Drag-and-Drop Mode (igTree): This topic explains, with code examples, how to configure the Drag-and-Drop mode of the igTree control, in both JavaScript and MVC.
Configuring Custom Drop Validation (igTree): This topic explains, with code examples, how to configure custom drop validation of the Drag-and-Drop feature of the igTree control, in both JavaScript and MVC.
Drag-and-Drop API Reference (igTree): The topics in this group provide reference information about the events and properties of the igTree control that are related to the Drag-and-Drop feature.
The following samples provide additional information related to this topic
Drag and Drop - Single Tree: This sample demonstrates how to initialize the igTree control with the Drag-and-Drop feature enabled.
Drag and Drop - Multiple Trees: This sample demonstrates how to drag-and-drop nodes between two igTrees.
API and Events: This sample demonstrates how to use igTree API.
View on GitHub