
The igTreeGrid™ presents hierarchical data by combining the principles of a tree and tabular data into a single control. Inside the igTreeGrid hierarchical data is rendered using the same columns for each row while providing a way for users to expand and collapse child data.

As the igTreeGrid inherits the igGrid control, it is able to enjoy many of the same features and functionality. Some features differ in function and implementation to best suit the needs of hierarchical data (e.g. filtering, paging, etc.).
In order to maintain flexibility the tree grid features a configurable expansion indicator, which can be rendered inline in the first data column or in a standalone column. The expansion indicator can also be customized with a different look-and-feel to achieve custom visualizations (see the File Explorer sample).
As you become acquainted with the igTreeGrid you'll need to be comfortable with a few terms which have specific meaning in the grid's API and documentation.
| Term | Definition |
|---|---|
| Level | Applies to all data items/rows with equal number of parents in their respective hierarchy |
| Root level | The topmost rows that have no parent of their own |
| Non-leaf level | Rows that have BOTH at least one child AND a parent |
| Leaf level | Items at the lowest level of a hierarchical relationship with NO children AND a parent |
The igTreeGrid inherits the igGrid control and therefore shares many of the same APIs and end-user interactions. In some areas (like filtering, paging, etc.) the tree grid's implementation is different from what is found in the igGrid to better accommodate hierarchical data rendered in a tabular format. For details on how certain features are different between the igGrid and igTreeGrid make sure to read how igTreeGrid features differ from igGrid.
Much like the flat grid control, the igTreeGrid uses a TABLE or DIV element as the basis for its structure in the DOM. As data is revealed by clicking/tapping on the expansion indicator in the parent's row, the table row and cell elements needed to render child rows are created on-the-fly. For more detailed information on performance considerations for the igTreeGrid, please see the Performance section.
The tree grid enjoys a disconnected architecture in the same manner as other Ignite UI for jQuery grids. Under the surface the igTreeGrid is powered by the igTreeHierarchialDataSource component. The data source component is responsible for implementing logic for features that directly affect the tree grid's source data before its ready to be presented to the user. For details about this specialized data source, see igTreeHierarchicalDataSource.
The igTreeGrid supports two different types of data sources: flat and hierarchical data.
Note: Having a uniform schema in all data objects is essential in rendering data in the tree grid. While both the flat and hierarchical data source types use slightly different approaches to maintaining a hierarchical relationship in the data, the rest of the data members are identical in the objects.
Flat data, or self-referencing data, consists of a simple object array where a primary key/foreign key relationship exists in the schema of the data.
An example of a flat data source looks like the following:
var data = [
  { id: 1, supervisorId: 0, firstName: "John", lastName: "Smith", title: "CEO" },
  { id: 2, supervisorId: 1, firstName: "Mary", lastName: "Edwards", title: "Manager" },
  { id: 3, supervisorId: 2, firstName: "Matthew", lastName: "Jones", title: "Clerk" }
];
Here the supervisorId relates back to the id value of the data in the array. In order to configure the relationship in the grid you must provide values for both the primaryKey and foreignKey options. The following code snippet demonstrates how to initialize the tree grid with a flat data source:
$('#treegrid').igTreeGrid({
  dataSource: data,
  primaryKey: 'id',
  foreignKey: 'supervisorId',
  ...
});
The tree grid below is bound to a flat data source:
Hierarchical data sources have a nested relationship where child data exists as an array member of the parent data object. An example of a hierarchical data source looks like this:
var data = [{
  id : 1,
  firstName : "John",
  lastName : "Smith",
  title : "CEO",
  employees : [{
    id : 2,
    firstName : "Mary",
    lastName : "Edwards",
    title : "Manager",
    employees : [{
      id : 3,
      firstName : "Matthew",
      lastName : "Jones",
      title : "Clerk"
    }]
  }]
}];
The hierarchical data's relationship is managed by using an array of objects in the employees member. To initialize the tree grid with hierarchical data you need to use the childDataKey option to establish the relationship:
$('#treegrid').igTreeGrid({
  dataSource: data,
  primaryKey: 'id',
  childDataKey: 'employees',
  ...
});
The tree grid below is bound to a hierarchical data source:
As stated earlier, the igTreeGrid inherits the igGrid and provides custom implementations for some features of the grid. The following table highlights some of the differences between the features found in each grid.
| Feature | igTreeGrid | igGrid |
|---|---|---|
| Sorting | Recursively sorts rows by column within the hierarchical structure of the data | Sorts rows by all data in a column |
| Paging | Creates pages from only root records OR based on all data | Creates pages from all bound data |
| Filtering | Renders matches to filter criteria in context of its hierarchy | Renders only exact matches to filter criteria |
Note: Unlike the igGrid, the igTreeGrid expects a flat data source if there is a value set for
foreignKey.
While the igTreeGrid and igHierarchicalGrid are both created to present hierarchical data, there are distinctions when you may want to select one over the other. The biggest distinguishing factor among the two grids is that the igTreeGrid displays each row using the same columns, while the igHierarchicalGrid supports the ability render data with varying schemas among different hierarchical levels. The following lists detail other ways in which the controls differentiate among each other.
The igTreeGrid:
igGrid instanceThe igHierarchicalGrid:
igGrid instance (with its full DOM) for each child layout as well as for the root dataSo while there are many similarities between the igTreeGrid and the igHierarchicalGrid, they each serve a specialized purpose.
Beyond the minimal overhead design of the Tree Grid there are also built-in features that can drastically improve performance with large data sets. Virtualization helps boost performance by allowing the number of actual rendered rows (DOM elements) remain constant in the grid while being dynamically reused to render the new data.
Note: Currently the
igTreeGridsupports only continuous flavor of Virtualization, therefore thevirtualizationModemust always be set to the appropriate value:
$("#treegrid").igTreeGrid({
    //...
    rowVirtualization: true,
    virtualizationMode: "continuous"
});
Other features that help increase performance include Load on Demand and the opportunity to take local operations to the server with Remote Features.
Note: The performance enhancements suggested here are best realized when using very large sets of data with the tree grid.
Related topic: Performance Guide (igGrid)
Initializing the igTreeGrid requires that you pass an options object that defines the characteristics of the grid. The following code snippet demonstrates how to create a grid bound to a flat data source that includes filtering, sorting and paging.
$('#treegrid').igTreeGrid({
  dataSource: employees,
  width: '500px',
  height: '375px',
  primaryKey: 'employeeId',
  foreignKey: 'supervisorId',
  autoGenerateColumns: false,
  columns: [
      { headerText: 'ID', key: 'employeeId', width: '150px', dataType: 'number' },
      { headerText: 'First', key: 'firstName', width: '150px', dataType: 'string' },
      { headerText: 'Last', key: 'lastName', width: '150px', dataType: 'string' }
    ],
  features: [
    {
      name: 'Filtering',
      displayMode: 'showWithAncestorsAndDescendants'
      //displayMode: 'showWithAncestors'
    },
    {
      name: 'Sorting'
    },
    {
      name: 'Paging',
      mode: 'allLevels',
      //mode: 'rootLevelOnly',
      pageSize: 5
    }
  ]
});
Notice that in this case values for both primaryKey and foreignKey are present in order to establish a relationship among data records.
The Filtering and Paging features are shown to include commented out option values that are available for these features. For more information you can read about how Sorting, Filtering and Paging are implemented specifically for the tree grid.
<!DOCTYPE html>
<html xmlns="http://www.w3.org/1999/xhtml">
<head>
    <meta charset="UTF-8" />
    <title>igTreeGrid</title>
</head>
<body>
    <table id="treegrid"></table>
    <script type="text/javascript" src="http://code.jquery.com/jquery-1.10.1.min.js"></script>
    <script type="text/javascript" src="http://ajax.googleapis.com/ajax/libs/jqueryui/1.12.1/jquery-ui.min.js"></script>
    <script type="text/javascript" src="http://cdn-na.infragistics.com/igniteui/2025.1/latest/js/infragistics.loader.js"></script>
    <script type="text/javascript">

        $.ig.loader({
            scriptPath: 'http://cdn-na.infragistics.com/igniteui/2025.1/latest/js/',
            cssPath: 'http://cdn-na.infragistics.com/igniteui/2025.1/latest/css/',
            resources: 'igTreeGrid.Filtering.Paging.Sorting',
            ready: function () {

                var employees = [
                    { "employeeId": 0, "supervisorId": -1, "firstName": "Andrew", "lastName": "Fuller" },
                    { "employeeId": 1, "supervisorId": -1, "firstName": "Jonathan", "lastName": "Smith" },
                    { "employeeId": 2, "supervisorId": -1, "firstName": "Nancy", "lastName": "Davolio" },
                    { "employeeId": 3, "supervisorId": -1, "firstName": "Steven", "lastName": "Buchanan" },

                    // Andrew Fuller's direct reports
                    { "employeeId": 4, "supervisorId": 0, "firstName": "Janet", "lastName": "Leverling" },
                    { "employeeId": 5, "supervisorId": 0, "firstName": "Laura", "lastName": "Callahan" },
                    { "employeeId": 6, "supervisorId": 0, "firstName": "Margaret", "lastName": "Peacock" },
                    { "employeeId": 7, "supervisorId": 0, "firstName": "Michael", "lastName": "Suyama" },

                    // Janet Leverling's direct reports
                    { "employeeId": 8, "supervisorId": 4, "firstName": "Anne", "lastName": "Dodsworth" },
                    { "employeeId": 9, "supervisorId": 4, "firstName": "Danielle", "lastName": "Davis" },
                    { "employeeId": 10, "supervisorId": 4, "firstName": "Robert", "lastName": "King" },

                    // Nancy Davolio's direct reports
                    { "employeeId": 11, "supervisorId": 2, "firstName": "Peter", "lastName": "Lewis" },
                    { "employeeId": 12, "supervisorId": 2, "firstName": "Ryder", "lastName": "Zenaida" },
                    { "employeeId": 13, "supervisorId": 2, "firstName": "Wang", "lastName": "Mercedes" },

                    // Steve Buchanan's direct reports
                    { "employeeId": 14, "supervisorId": 3, "firstName": "Theodore", "lastName": "Zia" },
                    { "employeeId": 15, "supervisorId": 3, "firstName": "Lacota", "lastName": "Mufutau" },

                    // Lacota Mufutau's direct reports
                    { "employeeId": 16, "supervisorId": 15, "firstName": "Jin", "lastName": "Elliott" },
                    { "employeeId": 17, "supervisorId": 15, "firstName": "Armand", "lastName": "Ross" },
                    { "employeeId": 18, "supervisorId": 15, "firstName": "Dane", "lastName": "Rodriquez" },

                    // Dane Rodriquez's direct reports
                    { "employeeId": 19, "supervisorId": 18, "firstName": "Declan", "lastName": "Lester" },
                    { "employeeId": 20, "supervisorId": 18, "firstName": "Bernard", "lastName": "Jarvis" },

                    // Bernard Jarvis' direct report
                    { "employeeId": 21, "supervisorId": 20, "firstName": "Jeremy", "lastName": "Donaldson" }
                ];

                $('#treegrid').igTreeGrid({
                    dataSource: employees,
                    width: '500px',
                    height: '375px',
                    primaryKey: 'employeeId',
                    foreignKey: 'supervisorId',
                    autoGenerateColumns: false,
                    columns: [
                        { headerText: 'ID', key: 'employeeId', width: '150px', dataType: 'number' },
                        { headerText: 'First', key: 'firstName', width: '150px', dataType: 'string' },
                        { headerText: 'Last', key: 'lastName', width: '150px', dataType: 'string' }
                    ],
                    features: [
                        {
                            name: 'Filtering',
                            displayMode: 'showWithAncestorsAndDescendants'
                            //displayMode: 'showWithAncestors'
                        },
                        {
                            name: 'Sorting'
                        },
                        {
                            name: 'Paging',
                            mode: 'allLevels',
                            //mode: 'rootLevelOnly',
                            pageSize: 5
                        }
                    ]
                });

            }
        });
    </script>
</body>
</html>
The easiest way to add a new igTreeGrid to your application is via the Ignite UI CLI.
To install the Ignite UI CLI:
npm install -g igniteui-cli
Once the Ignite UI CLI is installed the commands for generating an Ignite UI for jQuery project, adding a new igTreeGrid component, building and serving the project are as following:
ig new <project name>
cd <project name>
ig add tree-grid newTreeGrid
ig start
For more information and the list of all available commands read the Using Ignite UI CLI topic.
The following steps will guide you through the proccess of initializing the MVC igTreeGrid.
Steps:
1. Create a new MVC application.
2. Add reference to the Infragistics.Web.Mvc assembly.
3. Create a model class.
    public class FileExplorer
    {
        public string ID { get; set; }
        public string Name { get; set; }
        public DateTime DateModified { get; set; }
        public string Type { get; set; }
        public int Size { get; set; }
        public List<FileExplorer> Files { get; set; }
    }
4. Create a MVC Controller method that populates a List of data and returns it to the View.
public ActionResult AspMvcHelper()
        {
            var files = new List<FileExplorer>();
            files.Add(new FileExplorer
            {
                ID = "1",
                Name = "Documents",
                DateModified = new DateTime(2013, 9, 12),
                Type = "File Folder",
                Size = 4480,
                Files = new List<FileExplorer> {
                    new FileExplorer { ID = "4", Name = "To do list.txt", DateModified = new DateTime(2013,11,30), Type = "TXT File", Size = 4448 },
                    new FileExplorer { ID = "5", Name = "To do list.txt", DateModified = new DateTime(11/30/2013), Type = "TXT File", Size = 4448 }
                }
            });
            files.Add(new FileExplorer
            {
                ID = "2",
                Name = "Music",
                DateModified = new DateTime(2014, 6, 10),
                Type = "File Folder",
                Size = 5594,
                Files = new List<FileExplorer> {
                new FileExplorer { ID = "6", Name = "AC/DC", DateModified =new DateTime(2014,6,10), Type = "File Folder", Size = 2726 ,
                    Files = new List<FileExplorer> {
                        new FileExplorer { ID = "8", Name = "Stand Up.mp3", DateModified = new DateTime(2014,6,10), Type = "MP3 File", Size = 456 },
                        new FileExplorer { ID = "9", Name = "T.N.T.mp3", DateModified = new DateTime(2014,6,10), Type = "MP3 File", Size = 1155 },
                        new FileExplorer { ID = "10", Name = "The Jack.mp3", DateModified = new DateTime(2014,6,10), Type = "MP3 File", Size = 1115 }
                    }
                },
                new FileExplorer { ID = "7", Name = "WhiteSnake", DateModified = new DateTime(2014,6,11), Type = "File Folder", Size = 2868,
                    Files = new List<FileExplorer> {
                        new FileExplorer { ID = "11", Name = "Trouble.mp3", DateModified =  new DateTime(2014,6,11), Type = "MP3 File", Size = 1234 },
                        new FileExplorer { ID = "12", Name = "Bad Boys.mp3", DateModified =  new DateTime(2014,6,11), Type = "MP3 File", Size = 522 },
                        new FileExplorer { ID = "13", Name = "Is This Love.mp3", DateModified =  new DateTime(2014,6,11), Type = "MP3 File", Size = 1112 }
                    }
                }
             }
            });
            files.Add(new FileExplorer
            {
                ID = "3",
                Name = "Pictures",
                DateModified = new DateTime(2014, 1, 20),
                Type = "File Folder",
                Size = 1825,
                Files = new List<FileExplorer> {
                    new FileExplorer { ID = "14", Name = "Jack's Birthday", DateModified =  new DateTime(2014,6,21), Type = "File Folder", Size = 631,
                        Files = new List<FileExplorer> {
                            new FileExplorer { ID = "16", Name = "Picture1.png", DateModified = new DateTime(2014,6,21), Type = "PNG image", Size = 493 },
                            new FileExplorer { ID = "17", Name = "Picture2.png", DateModified = new DateTime(2014,6,21), Type = "PNG image", Size = 88 },
                            new FileExplorer { ID = "18", Name = "Picture3.gif", DateModified = new DateTime(2014,6,21), Type = "GIF File", Size = 50 }
                        }
                    },
                    new FileExplorer { ID = "15", Name = "Trip to London", DateModified = new DateTime(2014,3,11), Type = "File Folder", Size = 1194,
                        Files = new List<FileExplorer> {
                            new FileExplorer { ID = "19", Name = "Picture1.png", DateModified = new DateTime(2014,3,11), Type = "PNG image", Size = 974 },
                            new FileExplorer { ID = "20", Name = "Picture2.png", DateModified = new DateTime(2014,3,11), Type = "PNG image", Size = 142 },
                            new FileExplorer { ID = "21", Name = "Picture3.png", DateModified = new DateTime(2014,3,11), Type = "PNG image", Size = 41 },
                            new FileExplorer { ID = "22", Name = "Picture4.png", DateModified = new DateTime(2014,3,11), Type = "PNG image", Size = 25 },
                            new FileExplorer { ID = "23", Name = "Picture5.png", DateModified = new DateTime(2014,3,11), Type = "PNG image", Size = 12 }
                        }
                    }
                }
            });

            return View("aspnet-mvc-helper", files.AsQueryable());
        }
5. Create a View named "aspnet-mvc-helper".
In it reference the Infragistics.Web.Mvc.dll assembly and define the Model for the View:
In C#:
@using Infragistics.Web.Mvc
@model IQueryable<FileExplorer>
Add reference to the jQuery, jQueryUI and the IgniteUI scripts and css classes:
    <!-- Ignite UI for jQuery Required Combined CSS Files -->
    <link href="http://cdn-na.infragistics.com/igniteui/latest/css/themes/infragistics/infragistics.theme.css" rel="stylesheet" />
    <link href="http://cdn-na.infragistics.com/igniteui/latest/css/structure/infragistics.css" rel="stylesheet" />

    <script src="http://ajax.aspnetcdn.com/ajax/modernizr/modernizr-2.8.3.js"></script>
    <script src="http://code.jquery.com/jquery-1.11.3.min.js"></script>
    <script src="http://code.jquery.com/ui/1.11.1/jquery-ui.min.js"></script>

    <!-- Ignite UI for jQuery Required Combined JavaScript Files -->
    <script src="http://cdn-na.infragistics.com/igniteui/latest/js/infragistics.core.js"></script>
    <script src="http://cdn-na.infragistics.com/igniteui/latest/js/infragistics.lob.js"></script>
6. Define the igTreeGrid in the View.
In C#:
@(Html.Infragistics().TreeGrid(Model)
        .ID("treegrid1")
        .Width("100%")
        .AutoGenerateColumns(false)
        .PrimaryKey("ID")
        .ChildDataKey("Files")
        .RenderExpansionIndicatorColumn(true)
        .InitialExpandDepth(1)
        .Columns(column =>
            {
                column.For(x => x.ID).Hidden(true);
                column.For(x => x.Name).HeaderText("Name").Width("30%");
                column.For(x => x.DateModified).HeaderText("Date Modified").Width("20%");
                column.For(x => x.Type).HeaderText("Type").Width("20%");
                column.For(x => x.Size).HeaderText("Size in KB").Width("20%");
            })
        .DataBind()
        .Render()
    )
The below image demonstrates the end result.
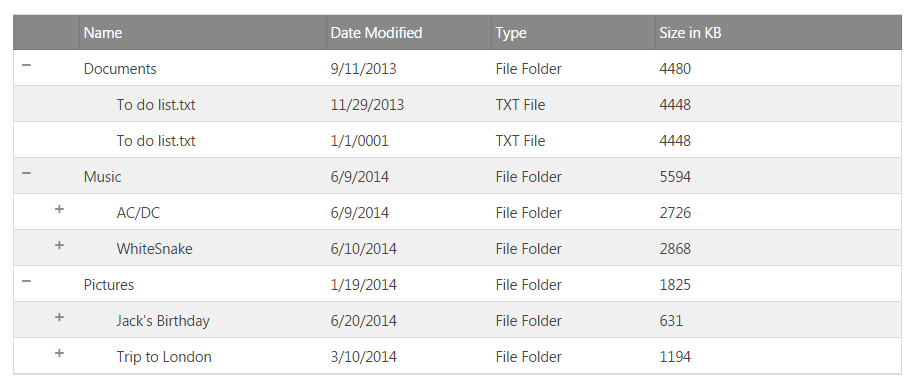
The expand and collapse icons can be customized via the following css classes.
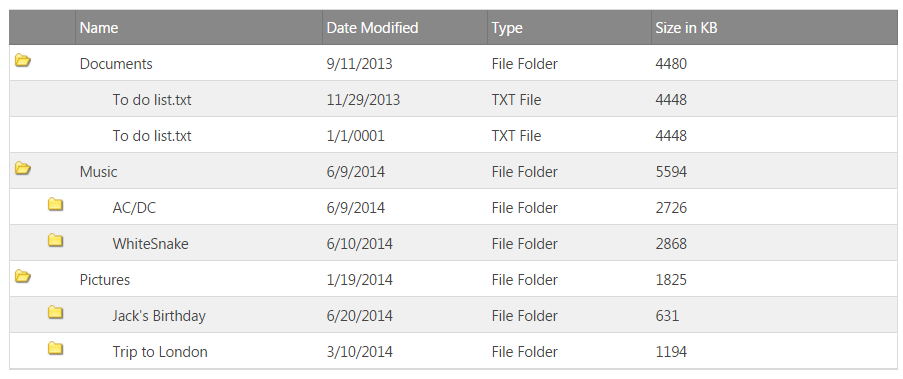
The below example demonstrates how to customize the default classes to set a custom image.
.ui-icon.ui-igtreegrid-expansion-indicator.ui-icon-minus {
            background: url(../../images/samples/tree-grid/opened_folder.png) !important;
            background-repeat: no-repeat;
}
.ui-icon.ui-igtreegrid-expansion-indicator.ui-icon-plus {
            background: url(../../images/samples/tree-grid/folder.png) !important;
            background-repeat: no-repeat;
}
.ui-icon-plus:before {
            content: '' !important;
}
.ui-icon-minus:before{
            content: '' !important;
}
The below image shows the result.
| Press | While | To |
|---|---|---|
| Space key / Enter key | Focus is on the expansion indicator cell. | Expand/Collapse the row. |
| Press | While | To |
|---|---|---|
| Up arrow or Shift + Tab | A row is selected. | Move to the row above. |
| Down arrow or Tab | A row is selected. | Move to the row below. |
| Right arrow | A row is selected. | Expand row. |
| Left arrow | A row is selected. | Collapse row. |
| Home or Ctrl+Home | A row is selected. | Move to top row. |
| End or Ctrl+End | A row is selected. | Move to bottom row. |
| Right arrow | An expanded or leaf row is selected. | Scroll left. |
| Left arrow | An expanded or leaf row is selected. | Scroll right. |
| Press | While | To |
|---|---|---|
| Up arrow | A cell is selected. | Move to the cell above. |
| Down arrow | A cell is selected. | Move to the cell below. |
| Right arrow | A cell is selected. | Move to the cell on the right. |
| Left arrow | A cell is selected. | Move to the cell on the left. |
| Alt + Down arrow or Enter key | The expansion indicator cell is selected. | Expand row. |
| Alt + Up arrow or Enter key | The expansion indicator cell is selected. | Collapse row. |
| Home | A cell is selected. | Move to leftmost cell in the row. |
| End | A cell is selected. | Move to rightmost cell in the row. |
| Ctrl+Home | A cell is selected. | Move to top left cell in the grid. |
| Ctrl+End | A cell is selected. | Move to bottom right cell in the grid. |
The easiest way to add a new igTreeGrid with Excel Exporting configured is via the Ignite UI CLI. To install the Ignite UI CLI:
npm install -g igniteui-cli
Once the Ignite UI CLI is installed the commands for generating an Ignite UI for jQuery project, adding a new igTreeGrid component configured for Excel Exporting, building and serving the project are as following:
 ig new <project name>
 cd <project name>
 ig add tree-grid-export newTreeGridExport
 ig start
For more information and the list of all available commands read the Using Ignite UI CLI topic.
igTreeGrid control.igTreeGrid control.igTreeGrid Load on Demand functionality and how it can be implemented.View on GitHub